Construction in Russia and countries in the same climatic zone has a large list of features related to insulation and waterproofing in buildings. Owners of private houses, apartments on the upper floors, owners of saunas, baths and steam rooms are forced to warm not only the walls, but also the ceilings.

One of the best options in this situation is to insulate the ceiling with mineral wool. And here's why: if you take into account the economic and climatic realities of the CIS countries, then ideal thermal insulation should have the following qualities:
- Resistance to moisture, temperature changes.
- The material should be affordable in terms of price and prevalence.
- The creation of thermal insulation should not require complex tools, techniques and technologies.
- Thermal insulation material should have a long shelf life.
- Another important quality is the inability to use the material with pests, mold and fungus as a habitat.
Mineral wool is very cheap, it is on any construction market, it is easy to use, it lasts a long time, and unwanted "neighbors" will not settle in it. The only negative is that it can get wet and lose its properties. Because of this, special attention should be paid to steam and waterproofing.
What will be needed for installation
This material can usually be found in two forms:
- rolls in which the layer thickness reaches 5 cm,
- slabs or mats 10 cm thick.
A mandatory selection criterion is the presence of a layer of foil on one side. This layer serves as a waterproofing agent, and if it is not there, you will have to buy foil separately or purchase foil foamed polyethylene. However, it is quite possible to replace it with a film of polyethylene. The main thing is that there are no holes in it, and its density is high. Most often, glassine is used for vapor barrier. You will also need:
- screws and a drill,
- construction stapler,
- wooden boards and bars or a metal profile,
- adhesive for synthetic materials,
- stationery or garden knife,
- nails and a hammer
- measuring instruments
- tight gloves, respirator, goggles.
After acquiring all the tools you can get down to business. In no case should you work with mineral wool without a set of protective accessories. It consists of thin synthetic fibers that can crumble and break, and if it enters the respiratory tract or mucous membranes, irritation will begin at best, and severe and dangerous inflammation at worst.
In more detail: "Vapor barrier in a wooden floor»
Types of insulation techniques
Warming is divided into three varieties: external, internal and combined. These types have their advantages and disadvantages. External insulation is laid on the attic floor, and internal insulation on the ceiling of the insulated room. Combined thermal insulation combines both methods and is required either in saunas, baths and steam rooms, or in severe frost.
To understand how to insulate the ceiling with mineral wool, you need to ask three questions:

- What is the optimal thickness of the mineral wool for ceiling insulation?
- Do you need vapor barrier and waterproofing? Are they required?
- How to arrange the glassine and moisture resistant material?
Typically, 10 cm of insulation is sufficient to provide good enough heat storage in the room. The most difficult cases require a layer of 15-20 cm.
Steam and waterproofing are extremely important and mandatory, since wet mineral wool loses 40% of its thermal insulation properties, moisture in it can cause rotting of the surrounding wood.
The installation of glassine and waterproofing agent is carried out depending on the chosen method. Remembering these simple rules, you will know how to properly insulate the ceiling with mineral wool.
How to make warming correctly?
Insulating the ceiling with mineral wool using an external method is more difficult to do, but in the case of apartments, attics, balconies, baths and other rooms without an attic, the use of this method is inevitable. It goes well with a false ceiling, and is also simple enough to repair.
The main problem of the external method of insulation is that the insulation needs to be fixed somewhere, and in order to fix it, you will have to design a separate frame - the crate.
The external method involves the insulation of the ceiling from the attic. It turns out the insulation of the ceiling from the inside. This is a good option, but putting an old refrigerator on such a floor without building additional structures would not be the best solution. That is, you have to re-mount the floor from the chipboard or OSB. Both methods have the same sequence of actions.
In more detail: "How to insulate the ceiling with expanded clay»
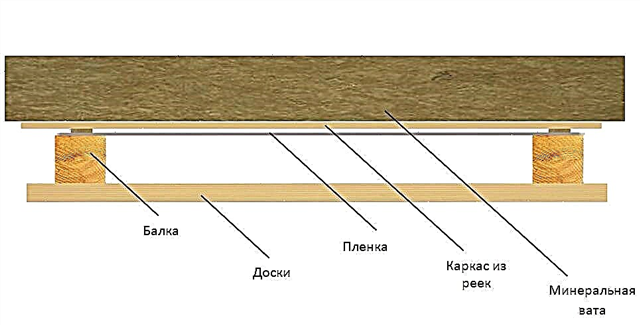
Installation of the lathing
The frame can be made of boards 3-4x10-20 cm, where the width should correspond to the thickness of the insulation, and the length - the area of the ceiling. The structure is attached to the ceiling using nails or self-tapping screws, while the gaps between adjacent beams must necessarily correspond to the width of the mats or rolls of glass wool used.
A waterproofing agent is mounted to the finished crate, preferably with overlapping strips on both sides. The strips are nailed to the counter rails or the profile of the frame with nails or fastened with a stapler, screws. It is recommended that the strips be glued with construction adhesive or duct tape for reliability.
Laying and fixing
After this, mineral wool is laid and fixed with glue or a stapler to the ceiling or floor, with a 20-cm layer, you need to pay attention to fastening the rolls to the crate. Then a glassine is mounted on the mineral wool, most often with a stapler or duct tape.
The structure is fixed with counterrails and a transverse profile, angles and joints with walls are filled with construction foam to increase reliability.
The final stage is the installation of a stretch ceiling or reconstruction of the floor.
Masters Tips
There are some tips you can give to beginners who have not dealt with glass wool:
- If a metal profile is used, then the use of construction foam cannot be avoided - it often turns out that cold air enters the room at the corners.
- When warming, you should not be afraid of mistakes, since any calculations may have errors that will lead to a mismatch in the size of the crate with respect to the dimensions of the insulation layers. This problem is solved by an additional system of bars, and in the case of metal fittings, by reducing the volume of mineral wool.
- When laying mineral wool, in no case should it be pressed or tamped - it loses its useful qualities.
- When laying communications in the thickness of glass wool to ceiling lighting sources, it is necessary to take care of insulation so that the lamps burn out less often.
Using these simple rules, anyone can insulate the ceiling with mineral wool in a private house, apartment, bathhouse and other rooms.
Selection of mineral wool according to technical indicators
Insulation of the ceiling in a private house with mineral wool means choosing the right material. The answer to the question of which mineral wool is better, experts consider based on the characteristics.

The insulation has two classifications:
- Mats are low strength indicators. Sold in rolls for easy transportation.
- Plates - increased strength, two types - rigid and semi-rigid.
- Cylinders - a special material for insulation of pipelines.
According to the raw materials used for manufacturing: basalt wool, glass, slag.
It is basalt fiber that has become widespread. Stone wool (the second name of basalt slabs) is highly durable and is used to insulate the ceiling and walls exposed to intense loads, including mechanical.
Material is produced from crushed and molten basalt as a result of which the material has a fibrous structure. After the fiber is pressed and heated under the influence of high temperatures. It produces basalt cotton wool, including in the form of plates.

Preferred indicators and choice of plate thickness
The following advantages are characteristic of mineral wool:
- a light weight,
- elasticity,
- fire resistance
- low price
- long service life.
The thickness of the mineral wool is an important parameter when choosing a material. This indicator depends on the ceiling coverage. It also takes into account which method will be chosen to insulate the ceiling with mineral wool. So, with concrete ceilings, cotton wool is chosen with a thickness of at least 10 cm. If there is a heated attic space, an insulation with a thickness of 8 cm is used. The pitched roof type involves the installation of mineral wool 30 cm thick.

The preparatory phase before warming the ceiling with mineral wool
Correctly insulating the ceiling means that you need to carefully prepare the surface. The first priority is to make the ceiling perfectly flat. The surface is cleaned of old finishing materials. In the presence of bumps and protruding parts, they are eliminated with a hammer and a chisel.
On ceilings in old rooms, potholes, cracks and significant indentations at the joints are often diagnosed. Their sealing is carried out using putty. If there are seams between the panels on the surface, then they are cleaned and sealed with foam. When you plan to install or replace old wiring, then these activities are paramount.

If there are differences of less than 1 cm in level on the ceiling, leveling is done in 2 layers of putty. The first is necessary for rough work, because It is required to reach a flat surface. After application, the solution is allowed to dry for 24-48 hours. Finishing alignment is performed with fine putty. Then the surface dries completely, and it is treated with sandpaper.
The following tools will be required for installation:
- screwdriver
- hacksaw,
- screwdriver,
- water or laser level,
- plumb
- roller or paint brush,
- hammer,
- construction stapler
- stationery knife,
- ladder.
Consumables list:
- mineral wool,
- metal corners
- wood and metal screws,
- Izospan for vapor and moisture insulation,
- putty,
- polyurethane foam and a gun for it,
- construction tape
- a bar made of metal or wood,
- paste,
- the expansion bolt shield is dish-shaped.
If it is planned to install a stretch ceiling after insulation, then additional tools and materials will be needed.

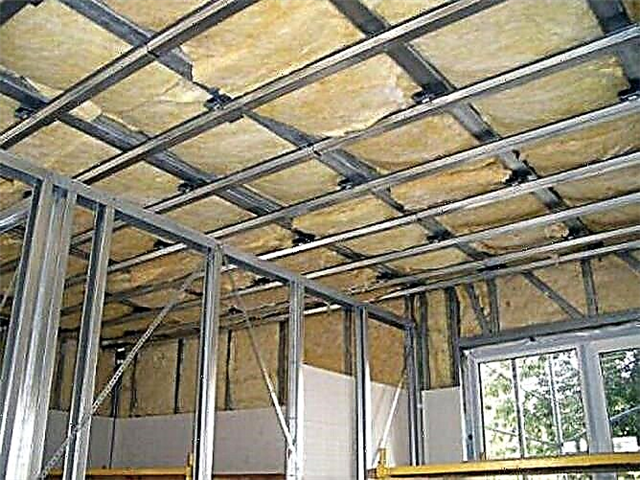
Types of fasteners and technology for fixing indoor mineral wool
Laying of insulation indoors is usually carried out in the apartment. Mounting mineral wool is carried out in several stages:
- The construction of the frame. To do this, install a metal crate for a false ceiling. The profile of the metal crate has standard parameters. For a wood frame, boards of 30 × 100 mm or 40 × 200 mm are used, based on the weight of the plates. That is, the heavier they are, the more massive the crate will be. Reiki needs to be fixed the expansion bolt shield with suspensions, with a step of 55-60 cm. This distance is optimum when laying a minvata in plates.
- Installation of waterproofing material. The film is cut into strips of 65-70 cm, i.e. slightly larger than the width of the intervals between the rails. For fastening to a wooden frame, nails are used, for metal - self-tapping screws.
- The insulation is laid in two ways - using a construction stapler or on a specialized paste. In parallel, a vapor barrier is mounted as the top layer.
The result of high-quality work is a stably durable “cake” of three layers without gaps between the mineral plates. Plasterboard is seated on the lower profile, which closes the thermal insulation. After that, you can install lighting fixtures and decorate, according to the project.

Step-by-step instructions for insulating the ceiling from the attic
Laying minvata from the attic allows you to create the necessary microclimate in a private house and prevent the occurrence of a pathogenic environment in the form of a fungus.
Note: Minvata is a unique material for insulation, however, for outdoor work, free access to the ceiling structure is required.
The sequence of work on the mineral wool insulation of the ceiling from the attic:
- Installation of vapor barrier materials. If there are lags in the attic, the film is laid on top.
- If there are no lags, then they will have to do their own production. To do this, you need to take rails of wood or a profile of metal. At the same time, the crates are high and the thickness should be identical to the dimensions of the insulation.
- Between the lags are laid slabs of mineral wool.
- Upon completion of installation, fasten the mineral wool to the ceiling with dowels with a large diameter of the cap.
- The waterproofing layer is laid last.

Step-by-step instructions for installing mineral wool:
- Creating a framework for ceiling ceilings. A wooden beam or a metal profile is used for work with drywall. Shooting the frame is recommended on the floors, according to the taken measurements of the area. The finished crate is mounted in two stages - the installation of a horizontal beam and the fastening of vertical battens. The lathing is fixed with nails or self-tapping screws on wood or metal, depending on the material chosen.
- The inner space of the frame cells is filled with thermal insulation. In a convenient area of the floor or table, mineral wool is cut according to the size of the cells. To fix the insulation, experts recommend glue. It should be applied with a paint roller or a wide brush.
- After the mineral wool is fixed, it is strengthened with dowels of the “umbrella” type. First, they are clogged in the center of the cell, and then along the edges. The minimum number of fasteners per cell is 5 pcs.
- Installation of vapor barrier materials. At this stage, a stapler is used to fix the film. The layers are overlapped and additionally fixed with tape. The film is neatly cut into even strips, given that their width should be greater than the distance between the beams. Otherwise, it will be impossible to fix the vapor barrier.
- According to the readiness of the thermal insulation structure, it is fastened by transverse fixation with counter-tracks or with a metal profile.
- The final stage is the finishing of the crate with plastic panels, plasterboard sheets or a stretch ceiling.

If insulation is used in rolls, the way of fixing it will be different. To do this, nails with a pitch of 10-15 cm are stuffed into the frame. A wire is wound around the end. When installing mineral wool, the wire should be pulled in zigzags on the following nails. The result is a mesh that holds the insulation inside.
As a rule, thermal insulation work inside and outside the house is carried out in exceptional cases. Such a need arises for rooms by constantly maintaining heat inside, i.e. saunas and baths. In some cases, a double type of insulation is installed in irregularly heated rooms, i.e. in summer cottages and country cottages.
Features and characteristics of mineral wool
Mineral wool is made from various raw materials and is divided into three main types:
Most often in construction and repair work is used - basalt fiber. By properties, it is the most durable and is used in places exposed to severe loads. Such material is produced in the form of rigid plates, and glass wool is also sold in the form of roll material.

The main advantages of mineral fiber:
- low thermal conductivity and good sound insulation,
- resistance to high temperature effects,
- acceptable price,
- among competitors the most environmentally friendly,
- the material is not suitable for rodents and insects,
- fiber texture is not susceptible to decay processes,
- differs in the long operational period,
- ease of installation.

The main disadvantage is the high moisture absorption, due to which mineral wool loses its functions. There are various sizes and thicknesses of insulation. This greatly simplifies the process of selecting material for rooms of different sizes and architectures, as well as carrying out repairs. Mineral wool in the form of mats is transported in rolls, since they are of low strength, and the plates are folded on top of each other, since they are more rigid.
Tools and Supplies
To speed up the execution of work as efficient as possible, prepare all materials and tools in advance.
Of the main tools you will need:
- an electric tool for kneading glue and twisting self-tapping screws (electric drill or screwdriver),
- cutting equipment (stationery knife, saw or hacksaw),
- instrument for measuring horizontal and vertical planes (plumb, construction and hydraulic level),
- a suitable ladder or stepladder,
- painting tools (for applying glue, primer, putty and paint).

Consumables Used:
- mineral wool mats or rolls (depends on the chosen technical solution),
- guides to which the whole structure is attached (wooden bars, battens or metal profiles),
- dowels in the form of fungi, screws and screws of a certain length,
- glue, putty, scotch tape and foam for installation,
- waterproof film.

It is possible to carry out the installation of insulation with both external and internal sides, as well as in a combined way - depending on the convenience and geometry of the structure.
Warming options
- Internal insulation is not suitable for every room, since it requires a space with a width of 15 to 45 cm. For low ceilings, the solution is impractical. The thickness of the insulation layer depends on temperature differences and the selected insulation.
- External insulation (from the attic) requires careful attention to utilities laid in the attic. They must be protected from damage.
- The combined method involves a combination of internal and external techniques - the material is laid indoors and from the attic. This method is suitable for warming saunas, baths and rooms where it is necessary to maintain a high temperature for a long time.

Stages of work
Enters works: creation of a framework, vapor barrier, laying of a heater.
- First of all, you need to clean the surface.
- Next, make a frame of the selected material. Wooden beams should be knocked down according to the measured dimensions. They begin to mount the battens with horizontal guides, and after the screws they attach vertical rails to them.
- In accordance with the size of the cell, the crates are cut in a convenient place to the mineral wool into slabs.
- Apply special glue and fix the plates in the chosen place, observing the order and fixing with special dowels in the form of an umbrella or mushroom in the amount of five pieces per sheet.
- Immediately after fixing the plates, installation of the vapor barrier is started in order to avoid the formation of condensation on the mineral wool. Layers of waterproofing film, cut into strips slightly wider than the beams themselves, are lapped on top of each other using a stapler and construction tape.
- Next, the structure is fixed with slats and covered with the selected decorative coating.
Insulation of the ceiling with mineral wool in the apartment
The sequence of actions described above is the same for a private house, and for an apartment. The only significant difference is the fact that installation in the house is possible both indoors and outdoors, and in the apartment the possibility of insulation is possible only from the inside. Since mineral wool has excellent soundproofing properties, it is most often used for this purpose in the decoration of floors.

Advice! The ceiling height in the apartment is quite important, so study the selection of materials and installation method carefully enough.

After finishing the insulation of the ceiling with mineral wool in the apartment, select the following finishing coat: plastic panels, drywall or stretch ceiling - your choice.
Ceiling insulation on wooden beams
Earlier, we examined the phased method of insulation from the inside, the most suitable for apartments and houses, where there is no possibility of insulation from the outside. One of the obstacles may be low ceilings. We should not forget about the advantages of insulation from the outside - the process is quite simple and will not require a violation of the integrity of the ceiling indoors.

Advice! Before warming the attic floor, inspect it and make sure that the installation is accessible over the entire plane.

The thermal insulation process is divided into several stages:
- clean the attic floor from dust, debris and unnecessary things,
- check the surfaces for leaks (seal all cracks and joints with tape or blow foam),
- spread vapor barrier material between the wooden beams, taking into account the overlap on the gluing of its joints,
- lay mineral wool in such a way as to avoid tearing and clearance between it,
- cover the rockwool with planks or pressed panels.

Important. The height of the crate should correspond to the height of all layers of insulation.
Tips & Tricks
- For cold rooms, the thickness of the insulation layer should be at least 30 cm.
- The quality of the insulation of a room is determined, first of all, by careful installation and compliance with a certain technology.
- If several types of insulation are used, the principle of increasing vapor permeability must be observed - mineral wool can be laid on top of the foam, but vice versa - it is forbidden.
- During installation, mineral wool must not be compressed.
- To achieve maximum sound insulation, mineral wool with a density of at least 40 kg / m3 is used.
- Be sure to use a vapor barrier that prevents condensation. It is laid on the bottom of the insulation indoors. The vapor barrier is not mounted on both sides, in this case the moisture will be closed in the insulation layer.
- Joints of a heater with a wall are treated with sealant or special tape.
Conclusion
Considering all the advantages of mineral wool, from environmental standards to technical operational characteristics, we can conclude that for the insulation of residential premises of different architecture and area, this is the most optimal option. An economically affordable and technologically simple way of warming will keep the warmth and peace of your home, and invested finances will pay off after the first winter.
Advantages of mineral insulation
Why do most people opt for mineral wool? This is because this insulation has a greater number of pluses than minuses. The positive qualities of mineral wool include:
- Affordable price,
- Convenient use
- Not afraid of pests (mice and rats),
- It does not rot and does not mold
- Fireproof material,
- It has soundproofing properties,
- Good vapor permeability
- Environmentally friendly material,
- It has increased strength,
- The thickness of mineral wool may be different.
Because of these qualities, mineral wool is the best material for insulating the ceiling. But, like any material, it has its drawbacks:
- It must not be crushed or tamped. This reduces its thermal insulation properties,
- Minvata is afraid of moisture. When wet, completely loses its properties.
This type of insulation is used in combination with other materials - polystyrene and plastic film. Thermal insulation in this embodiment will be reliable.
Types and features of mineral wool
When warming the premises, fibrous materials are used. They are of plant (such as cotton) and mineral origin. Only mineral fibers do not burn, so they are used in construction. There are few minerals suitable for fiber extraction. These include glass, rocks and some slag. In accordance with this, three types are distinguished:
- Glass wool. It is made of limestone, dolomite, sand, borax and cullet. It has low thermal conductivity, tolerates vibration well. The material is plastic, during transportation it can be tamped without the risk of loss of properties. It is made in the form of plates and cylinders for insulation of pipelines. It has a low cost. The leaders in the production of glass wool are Isover, KnaufInsulation, Ursa.
 Glass wool in a roll
 - Basalt cotton wool. This insulation is made from diabase, basalt, gabbro. Based on them, you can get materials of different densities, shapes. Accordingly, it is possible to vary the resistance to mechanical stress. Thermal conductivity is higher than that of glass wool. It is possible to create glass wool of different density, which makes it possible to make it flexible or strong and rigid. Flexible products from basalt wool are used in small buildings. Also a heater of such density is insulated with wells and pipelines. It is used in rooms with low mechanical stress. Thinner basalt cotton wool is used in private homes and for insulation of communications. If the wool is reinforced with metal wire and has a large thickness, then it can be used anywhere. It retains heat in the room, fire safety. Helps reduce the penetration of external noise. Figured products from this insulation process pipes and wells. With high mechanical loads, hard basalt wool is used. It is tear resistant, which allows it to be used, when thermal insulation sheets need to be fastened together. Basalt may have a base of foil or glass. To make it stronger use metal threads. Basalt cotton wool is produced by: Rockwool, Paroc, Nobasil, Danko-Izol, Technonikol.
 Basalt cotton wool. Various finished product options
 - Slaggy. It is made from waste during the smelting of cast iron in blast furnaces. It has high thermal conductivity. The downside is that it easily absorbs water. Therefore, for wet rooms and facades it is not used. Also, slag has a low resistance to vibration. Today it is used extremely rarely in construction.
 Slaggy. Cullet Fibers
Each type of mineral wool has its own advantages. It is important when choosing to use knowledge about the type of room, its size and purpose.
Mineral wool layer for ceiling insulation
The quality of the insulation is determined by the density of the fibers of the material, thermal conductivity and resistance to moisture. Due to its properties, mineral wool is increasingly used in construction. According to their characteristics, the types of mineral wool are different in terms of ease of use. So glass wool can cause itching on the skin, and the fibers are slaggy enough prickly. For the ceiling, it is better to choose basalt cotton wool.
Ceiling insulation is best done from the side of the roof covering. It is better to lay the insulation in 2-3 layers to block the joints. The technology of warming any ceiling with mineral wool is quite simple.
How to fix mineral wool on the ceiling
Mounting mineral wool to the ceiling is not difficult if you know the right technology. If external insulation from the attic is carried out, then cotton wool sheets are laid between the lags of the floor. It is necessary to leave a distance between the insulation and vapor barrier film. So that when pulling the cotton wool does not sag or slide down, it is pulled onto the twine frame. Then the rail and gypsum board or other ceiling material are stuffed. If the ceiling is solid or concrete, then a crate of metal profile or wooden bars is made on it. The step between the guides should be 57-59 cm. Next, mineral wool is laid. Then a vapor barrier is sewn to it with brackets. Next is a layer of drywall or other topcoat. If there is ventilation in the ceiling, then vapor barrier is not needed.
If you need to maintain the height of the ceilings, then the insulation is mounted directly to the ceiling without a crate. You can use dowels or adhesives to fasten mineral wool to the apartment ceiling.
Do-it-yourself mineral wool ceiling insulation
How to properly insulate the ceiling on your own? To make the ceiling insulated on its own is a completely feasible task. Moreover, mineral wool insulation greatly simplifies the process. First you need to decide which side the work will be done: internal or external. External insulation is carried out in the presence of an attic.
The main stages of external insulation of the ceiling:
1) The crate is made of bars or metal profiles. The section must be selected in accordance with the thickness and density of the mineral wool.
 Metal lathing option
2) A vapor barrier is laid. As it is most often used polystyrene, a thickness of 5 cm will be enough. Fasteners are carried out using counterrails.
 Styrofoam vapor barrier
3) Next, the insulation itself is laid. At the joints, it is better to make 2 layers.
4) A layer of waterproofing is laid. Most often, building brackets are used for fastening.
With the proper choice of materials and tools, even an inexperienced builder will cope with external insulation of the ceiling.
Internal insulation of the ceiling. Installation Nuances
This type of thermal insulation is most often used in buildings with second and subsequent floors, city apartments, shops and other commercial buildings. The process of insulation is simple, so you can do it yourself. Installation steps:
1) A waterproofing layer is attached to the ceiling using a construction stapler. The seams between the sheets are best closed with reinforcing tape. Waterproofing is used if the ceiling is wooden.
 Waterproofing layer
2) Collecting the crates. The cross-section of the bars and the steps between them should be selected taking into account the thickness of the mineral wool. You can fasten with dowels or screws.
3) Laying mineral wool on a regular ceiling. Can be attached to glue or staples. What is the best way to fix mineral wool on the ceiling? If you used a wooden crate, you can additionally fix the layer with nails and rope. A rope is passed through a snake through driven nails. This will insulate the insulation from dismantling due to moisture or vibration.
 Insulation tab
4) Mineral wool is covered with a layer of vapor barrier film using a stapler.
 Installation of vapor barrier film
5) A counter battens for installation of the finish coating is installed.
Installing thermal insulation from the inside has many steps, but you will not need special skills to complete them. Well-chosen tools and fasteners will facilitate the work. These include: a screwdriver or drill, screws, dowels, stapler and brackets, reinforcing tape, glue, tape measure.
In private houses and cottages, the combined method of insulation is most often used.
When working with mineral wool, use a respirator and protective gloves. This will help protect your airways and skin from the smallest particles of cotton wool. If during installation of the crate there are gaps due to irregularities in the ceiling, then it is better to cover them with mounting foam to avoid drafts. It happens that the thickness of the bars is less than what is needed for cotton wool. It is not necessary to crush the insulation, it is better to increase the bars additionally. The result of the work done can be checked using a thermal imager.This will eliminate installation errors before applying the finish coat. It is not necessary to buy a professional appliance. A special application has been released for many smartphones, which will be no less effective.
If you carefully consider the choice of materials and follow the installation steps, thermal insulation will protect the room ceiling from mold, frost and fungus. After all, a well-insulated house is a place where it is comfortable and pleasant to be.
Advantages and disadvantages
Like any other material, mineral wool has a set of advantages and disadvantages. Let's try to figure them out.
Advantages of mineral wool as a heater for the ceiling:
- Affordable and affordable prices. Usually, repairs are expensive. Therefore, a pleasant bonus will be the opportunity to save the family budget. Especially if this saving is not at the expense of quality.
- Ease of use. Using mineral wool is a pleasure. As a rule, it is produced and sold in the form of rolls and plates, which makes its operation as simple and convenient as possible.
- High fire resistance. A house fire is an unpleasant thing, but a possible one. Therefore, the safety of materials used for its construction, insulation and decoration is one of the most important qualities. Not only is the mineral wool itself fire resistant, it also prevents the spread of fire deep into your home.


- Light weight. Insulating the ceiling is not an easy task. For work you will need physical fitness and strength. Especially if you decided to make thermal insulation from the inside. The low mass of mineral wool will greatly facilitate the task.
- High density. The material has a fibrous structure, which provides high-quality not only thermal, but also sound insulation, which will be an additional pleasant bonus.
- Pest resistance. The composition of the insulation does not allow various undesirable "guests" (bugs, mice and other rodents) to start it.
- The possibility of prolonged use. Unlike some other popular heaters, mineral wool will serve you in the long run. Once using mineral wool as a material for thermal insulation of a home, you will enjoy its productive effect for many years.

- No unpleasant odor. This quality of the material allows its use in any residential premises. It is suitable even for children's rooms and rooms where people with allergies and intolerance to odors live.
- Environmental safety and cleanliness. A particularly important indicator of quality in the modern world. If you care about the state of your environment, then mineral wool is undoubtedly the right choice.
- High vapor permeability. In the warm season, this advantage will protect the building from overheating, and in the cold season it will contribute to the removal of excess fumes to the street.
- Fortress. The insulation does not lend itself to mechanical loads of different intensities.


However, nothing perfect exists. This also applies to mineral wool, so now consider the shortcomings of the material.
Disadvantages of mineral wool:
- Does not tolerate structural transformation. Mineral wool is a building material that cannot be crushed and compacted. This is due to the fact that when compaction of the fibers, its thermal insulation properties are significantly reduced.
- It does not tolerate moisture. Most often, for the insulation of ceilings, mineral wool is used in conjunction with additional materials, such as polystyrene and polyethylene in the form of a film. Such "cooperation" allows you to preserve the properties of cotton wool, prevent it from getting wet and provide effective and long-term thermal insulation of your room.


As you can see, the advantages of mineral wool as a means for warming ceilings are much greater than disadvantages. That is why a large number of construction specialists choose this material.
Thickness
The thickness of the mineral wool is one of the most important quality indicators. To make the right choice, carefully study the packaging, or better, consult with a specialist in a store or construction company. In general, the main thing you need to decide on is the number of layers with which you will put the insulation and the climate of the area in which you live. The thickness of mineral wool on average varies from 20 to 200 mm. Usually for thermal insulation of residential buildings use mineral wool with a thickness of 150 mm. However, here there are several options. So, 30 mm will be enough for thermal insulation of a flat horizontal roof, and about 200 mm will be needed for a pitched roof.

An important parameter when choosing is the building material from which the ceiling is made. So, in a situation of concrete floors, do not use mineral wool with a thickness of less than 100 mm. For those buildings in which there is a heated attic, the material can be thinner - up to 80 mm.
Which one to choose?
The modern market is filled with varieties of mineral wool. Moreover, they differ not only in the manufacturer and price, but also in the feedstock (glass, stone, slag).
Consider the main types:
- Slag cotton, for the most part, they are used in industrial enterprises: factories, factories, plants. This type of cotton wool is best used for thermal insulation of horizontal surfaces that do not have a large slope.
- Glass wool - material that can irritate your airways and skin due to pointed microscopic particles of which it consists. Most often, this type of cotton wool is used for thermal insulation of wooden structures and buildings.
- Stone wool - the most common type. It is produced and sold in bulk and is suitable for a wide range of tasks, being almost universal.
Also, when choosing mineral wool, you should pay attention to the place of its storage, which should be indicated on the package (the ideal option is a canopy). Do not purchase wet or wet material.
How to lay?
Using mineral wool, you can insulate the ceiling in any room (for example, in your private house) in 2 ways: outside and inside. External insulation is considered more economical, convenient and simple to implement, but insulation from the inside will be more effective. Let us consider step by step both options for thermal insulation of the room with our own hands.


External
Before starting direct work, the insulated surface must be thoroughly cleaned, getting rid of debris, dirt and other unnecessary elements. As mentioned earlier, it is advisable to use other materials along with mineral wool in order to avoid getting it wet. Therefore, for the next step you will need any waterproofing. The simplest is a plastic film. We cut the film into strips, which should be put between the beams, fixing the ends. After the film fixing procedure, mineral wool can be used. In case you decide to use an additional layer of protection against getting wet, foam plastic layers can be placed on a plastic film and only then use the main insulation - cotton. The installation technology for mineral wool is quite simple: it needs to be fastened tightly so that no cracks and gaps form.


Insulation should be laid in several layers. This advice will be especially useful for residents of cold areas. Joints of layers should not match. The last layer must necessarily cover the ceiling beams. This is necessary so that heat does not escape through the tree. After you have managed to lay the insulation, you should fix another layer of your chosen waterproofing (plastic film). The final step is to cover the insulation. You can use any coating. Most often, preference is given to wood.


Interior
The internal method of warming the room is somewhat more complicated. However, nothing is impossible. The first step is quite simple and similar to the first in the previous version: it is necessary to lay a layer of vapor barrier. Then we construct a wooden base, on which a suspended ceiling will later be located. Between the wooden sides of the structure, we tightly lay mineral wool. If you want to fasten more securely, you can use nails and wire. We drive nails on both sides of the bed of mineral wool, pulling the wire in a zigzag pattern.


Thus, mineral wool can be effectively used to warm even very cold concrete or stone rooms, instead of other heaters, for example, expanded clay.