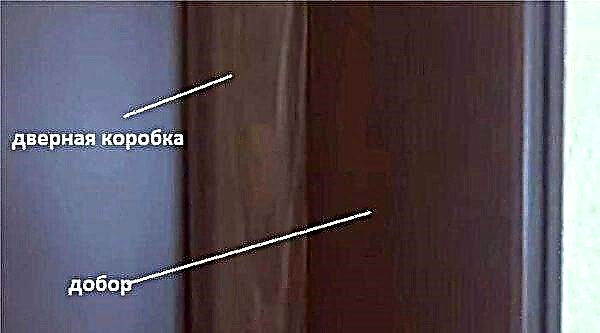
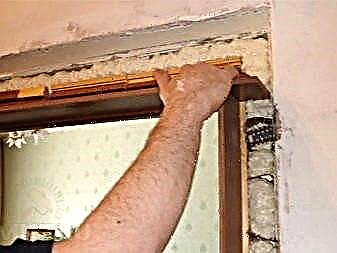
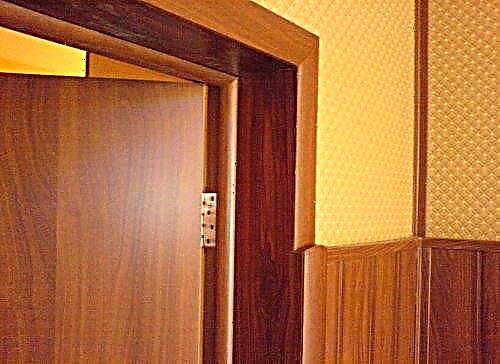
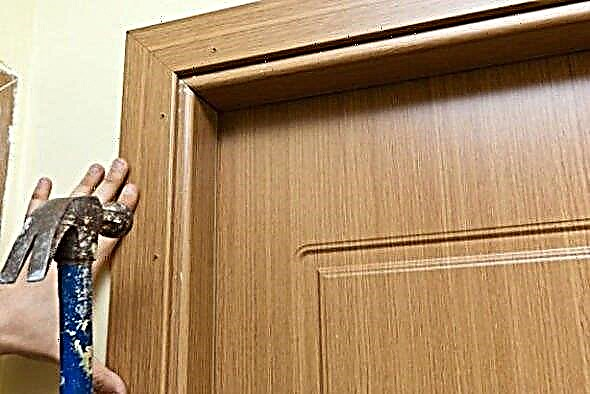
When installing interior doors, a situation arises when the box is smaller than the wall thickness. In such cases, a special board is used, which is attached to the door frame, covering the remaining space. This board is called an extension to the interior door. The names "additional board" and "additional board" are also found. Then you can attach a platband to it, which will close the gap between the extension and the wall.

Dobor - a board for expanding the door frame to the wall thickness
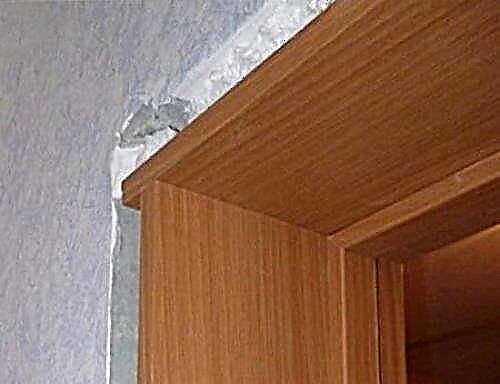
That is, the door extension is an additional part of the door frame. It is a board of certain sizes, which is joined with the door frame. They put it on one side - the opposite of the one into which the door opens. You can also call this board an expander - it displays its real purpose.

If the wall thickness is more than 140 mm, you have to put the door frame expander - an additional board
There may be nuances at the docking of an extension. Often the shape of the door frame is specific - with a special relief (protrusions, depressions, fillets). Then you will have to look for additional goods specifically for this company, otherwise it will be problematic to dock them.
Materials and sizes
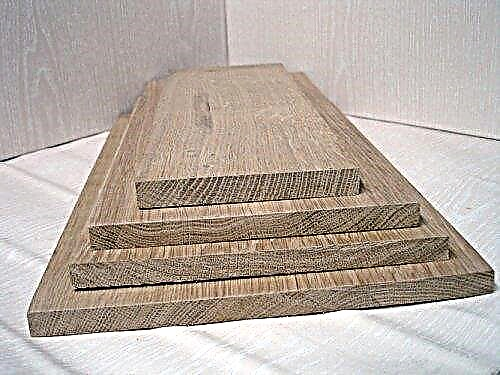
Each of the manufacturers produces a certain set of additional boards in which the length is fixed - 230-250 cm, the thickness / width changes. For example, there are such options (thickness, width, length):

Shape, thickness, width may vary
Thickness and width - each factory has its own. There can be 60 mm, and 65 mm or 75 mm. In general - any set. What if none of them is suitable for your case? Take a larger width than required, then saw off the excess. And if your opening is wider than all available options? Order the right size (many manufacturers make to order) or splicing two smaller sizes. Another option is to use telescopic platbands. They come with a bend around the corner, which can cover your width deficit.

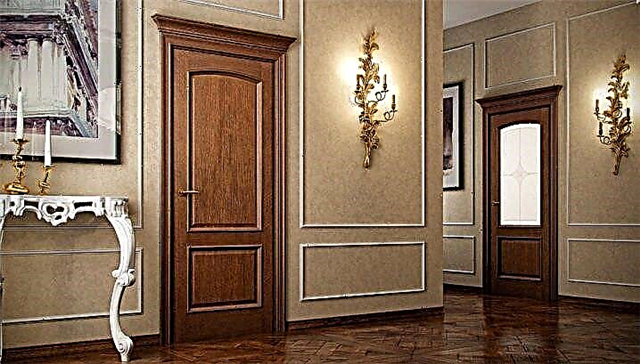
If the doors are solid oak, it makes sense to put the same kind
What materials do doors for interior doors make of? From the same as the platbands:
- wood,
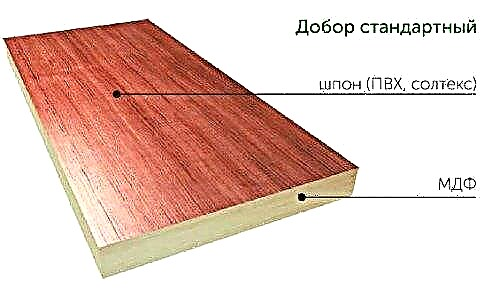
- MDF
- Chipboard.
MDF and particleboard can be veneered, laminated. Wooden can be with or without processing. Select the material and color to the door frame. And this is another reason to take it from the same manufacturer - even if the name of the color / texture matches, there is no guarantee that in fact they will be the same.
Types of extensions
An additional board is of two types:
- With straight edges. A plain board that is butt-joined with a box. May be:
- with a decorative edge,
- without a decorative edge.

Types of extensions for interior doors: telescopic on the left, ordinary - on the right
Extending an interior door with straight edges is the most common board. In this case, it must be selected only by color and size. The pressure is pressed to the box, fixed with diagonally mounted screws. One of the ends of the additional strips can be processed. This is necessary if the clypeus can be displaced.

Installing the extension with smooth edges (not telescopic)
It is not too convenient to mount this type of extensions. You have to think about not splitting the bar, about how to close the caps of the screws. However, it is not necessary to select the shape of the grooves / protrusions, which is far from simple and attaches to only one manufacturer.

If there are protrusions, grooves, fillets, an extension is needed for the interior door of the same company as the box
The telescopic door extension has preformed grooves. From the point of view of docking, this is a very convenient option: they drove the protrusion into the groove, tapped it to complete coincidence and the entire installation. But only if the match is perfect. What else is convenient telescopic extension? You can install a telescopic platband in it (if it fits).
How to install extensions on the interior door
In this paragraph we will talk about the usual planks - with straight ends. They sell for a length of 2100-2300 mm. One door needs three slats: One on the right and left, and a piece from the third will go to the top. If you put several doors at the same time and they have the same color, one bar will go to the two “tops”.

How to fix dobors on the interior door
The strips in width and length are usually larger than necessary, so they will have to be cut. Which tool? What you have. Youyuba who saws DMF, chipboard or wood will do. To arrange the corners, you may need a miter box (if you are going to dock the box (and extensions) at 45 °. It is also convenient to use it so as not to “overwhelm” the saw cut and make it strictly perpendicular.
Take sizes and make blanks
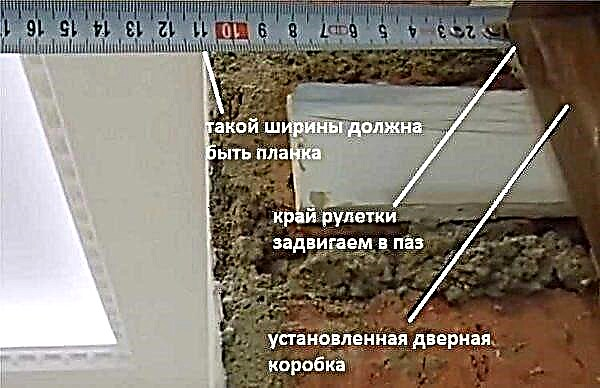
Before installing the extensions on the interior door, you need to find out the exact dimensions of the expansion strips. To do this, install the door frame in the doorway, fix it. On the plan, draw an opening, it will be easier to write the dimensions. Next, we take the roulette and the level, measure the sizes of the extensions that you need.
- The width of the extension is defined as follows: we insert the measuring tape of the roulette into the groove until it stops. We apply a level to the wall, at the place of intersection with the tape measure determine the necessary width. We take measurements at six points: two on each side. If the wall has an unequal thickness, we take the width of the extension according to the largest figure.
Now in size from the standard strips we cut out those that we need. Marks with a pencil - on light bars a simple pencil is clearly visible, on dark bars you can take white. We try on the cut strips in the opening, if necessary, we cut a little.
We collect
Before you put the extras on the interior door, they must be connected together. We lay out the additional trim strips on the floor in the form of the letter "P". If they have a processed edge - lay out so that the edge is on one side. The strips will need to be connected to each other. If they are made of MDF or particleboard, you must first drill holes in the upper crossbar.
Assembly preparation
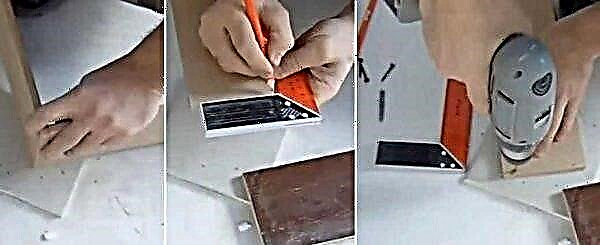
To do this, it is better to take a square (ideally a carpenter's, but an ordinary school one will do). On the bar, draw a line that marks the middle of the thickness of the bar. If the thickness of the additional board is 10 mm, the line runs at a distance of 5 mm from the edge. If the plank is 15 mm thick - at a distance of 7.5 mm. We put two points on this line, and then drill holes. Diameter - 1 mm less than the diameter of the screws.
Finish assembling the door frame
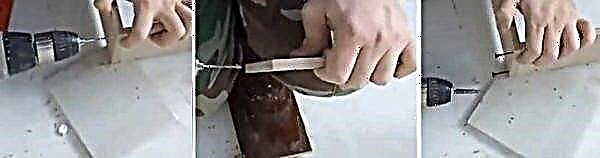
Next, the holes must be moved to long strips. To do this, we join them, align the edges. Using a drill, transfer marks to the end of the bar, then deepen to the required length (along the length of the self-tapping screw). Having made holes, we join the trims, we twist the fasteners. The extension to the interior door is half assembled. But do not rush to attach the second bar. It is necessary to try on already assembled "in place".
Fitting and trimming
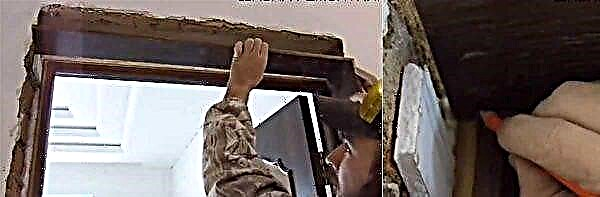
We put the assembled L-shaped part in place, driving the planks into the groove in the door frame. The upper jumper turned out more (we measured it like that). We take a pencil, put a mark where the groove begins. Try to be accurate, as this is important. Surplus can not be cut off. Just draw a line along the mark and make marks on it, then drill holes. After assembly, the letter "P" is obtained. We collected the extension for the interior door, now we need to install and fix it.
Door frame installation
Now the extension can be installed. Check the opening beforehand. If the doors were placed on foam, it can block the groove. We cut off the excess so that the slats go freely. We insert the U-shaped design into the groove, tapping the butt on the end with the palm of the hand. Start on top, then on the sides.

We put in place, having previously removed the excess mounting foam
We take masking tape, we fix the strips to the walls. If in some places the extension to the interior door does not fit snugly on the box (there is a gap), we remove this gap using the linings. You can use mounting wedges for this. If not, make foam. It is only necessary to set the bar level, for this purpose dense foam is enough.
Mounting an additional box
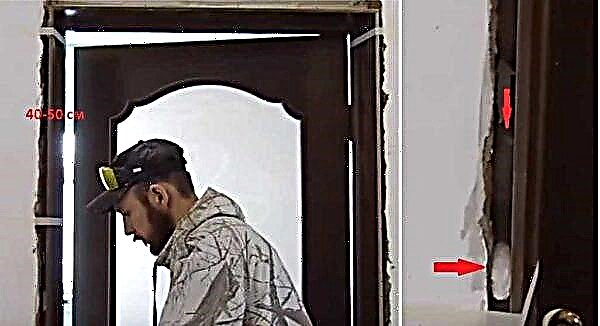
You also need to align the extension to the interior door to the level. Focus on the "eye" is not worth it, use the level. Using the level and wedges, we remove all the protrusions and blockages. In the process, we fix the aligned areas with masking tape. The distance between the tacks is 40-50 cm. One at the top and bottom (backing off about 10 cm), and further at equal intervals.
How to fix the extensions: during installation
Next, using low expansion foam, we fill it with the space between the wall and the additional level. Read the instructions on the bottle before use. It may be better to wet the surface. In any case, it is necessary to lay the mounting foam in stages, otherwise it may bend the trims. We'll have to rip everything off, clean and froth again.
So, first we apply the foam deep into the gap. A little, one lane. In parallel, we make strips the entire width near the “tacks” (an example of applying foam to the door extension in the photo above on the right). Foam in the area of the tack will give stability to the bar, the strip in the far part - near the junction - will press the extension to the groove, but it will not bend the bar.
Leave the foam to cure on the side slats, but for now, we are filling the gap from above. If it is as big as in the photo, it translates a lot of foam, it makes no sense. It’s easier to cut a “bookmark” from polystyrene foam and put a wooden block of the appropriate size. In size, it is slightly smaller than the free space. There should be a gap of at least 1 cm from all sides. But too large gaps are not needed.

How to put extras on the interior door: fill the upper gap
Next, proceed as follows:
- We place small pieces of polystyrene 1 cm thick or so under the embedded part.
- We apply a layer of foam with a snake on the back wall (if any).
- We put a mortgage bar, fill the cracks around the perimeter with foam. Again, not too much so that the bar does not bend down with foam.
- If necessary, put the “front” bar (in the photo above the bottom left). If the width of the bar is enough, skip this step.
- We align the position of the additional strip with the help of a building level, we fix it with masking tape.
After the first layer of foam has frozen (time is indicated on the cylinder), fill the rest of the space. If the extension to the interior door has a considerable width, it is possible (and better) to apply the foam in two stages. But each time it is necessary to wait for the polymerization time. After that, it remains only to install the platbands.
How to attach the extension to the door frame, if it is thicker than the selected quarter
Often the extension is thicker than the quarter selected in the box. What to do then? How to make the extension abut without gaps and hold tight? There is a simple way - diagonally drill holes, screw in screws, then cover the holes with plugs to match. Here everything is more or less clear, but not very beautiful - the stubs are still visible.
There is another way. Need suspensions for drywall. Only they should be the strongest and thickest. From the suspensions we separate the parts of the tape with perforation. Each produces two parts. Still need will be small screws (fleas). We fasten the perforated tapes to the door frame around the perimeter - at the corners, backing 10-15 cm, also from below, and in height at a distance of 40-50 cm.

How to fix an extension
We twist the screws by stepping back 1.5-2 cm from the edge of the box (middle photo). One screw on a piece of metal tape is enough. When the door frame is installed, the tape will stick out. These slats are thin, so there will be no problems with even the smallest clearance. If the door extension is the same width, just insert it. Plate due to elasticity presses it tightly.

How to put dobors if they are thicker than a quarter
If the extension is wider, first we bend them to the front part, then return them back. Due to the fact that they are not fixed to the edge, they are bent, become like an arc.
That's how it can happen - without the slightest clearance
Now insert the additional strips, leading them between the plates and the groove. They will press the bar tightly. Slots will not be visible even upon closer inspection.
What it is?
The process of installing an interior door includes several stages:
- collecting the box or skeleton in which the door will function,
- setting and securing the box in the doorway,
- door leaf preparation, installation of fittings,
- installation of the canvas in the box, adjustment and adjustment,
- trim in the doorway platbands.
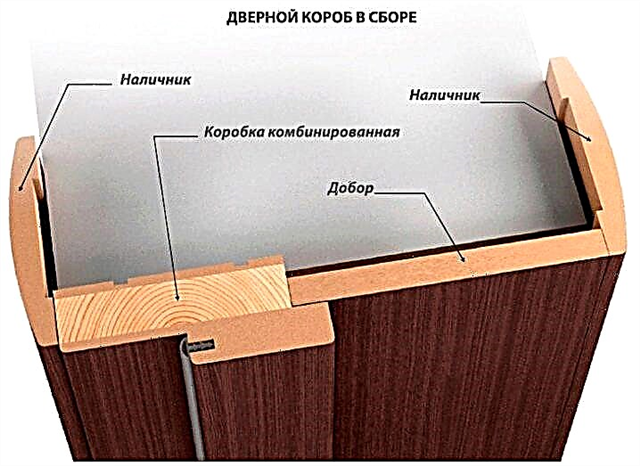
Doorknik on interior doors - this is a decorative element that is a box expanderif one does not match the width of the opening. He, as it were, continues the door frame, creating a single and integral design. Essentially, it is a 90 degree slope made of rectangular planks and platbands consisting of solid materials.


What do they look like?
Additional levels have a large gamut of color options. In the vast majority of cases, they are made of the same material as the door frame with the door. Therefore, it is more profitable to purchase doborniks along with a door and a box from one manufacturer or company. When assembled, the add-ons are U-shaped.
Cloths of extensions made of wood-based materials may be with a protective edge, or their ends remain untreated. Also, a groove can be made on the edge on one side, and a spike on the other. Such extras are a type of lining. Telescopic boxes are completed with such extras.

Why do you need it?
Extras for interior doors hide all defects of the opening, protect against mechanical stress, serve as additional reinforcement of the box, as well as an important decoration of the door.
The standard dimensions of the width of the door frame are 80 cm and 100 cm. If the width of the doorway is larger than these sizes, then during installation there is free space that needs to be ennobled. You can, of course, order a box of any width corresponding to the dimensions of the doorway, but the work done to order increases the cost of the purchased product at times compared to the standard order. And even more so when the door is made of rare wood.
Precisely for to close this free space and save on material, and we need such an element as extras. They serve to create your own design, make it possible to realize your imagination with the selection of material, color, style and shape.
The aesthetics of the entire interior depend on a carefully made door slope.

What are the types?
Types of extensions differ in the installation method:
- attached,
- underlays,
- combined
- telescopic.
You can attach them to the door frame both before installation and after, when the jamb is securely installed. For fastening before installation, either small self-tapping screws or glue are used.
You can fasten the box with the extension using thin metal plates. For example, pieces of "crocodiles" (fasteners for mounting rails) used to mount the frame under drywall.

Methods of collecting add-ons per box before installation:
- To begin with, we assemble the box by filing guides at 90 or 45 degrees, 6 mm more than the width of the door leaf, for a working gap of 3 mm around the perimeter of the leaf. If there is no quarter groove on the rails on the back, it must first be done on a circular machine or with a milling cutter.To use a chisel for this work is time consuming and requires professionalism to achieve the desired quality. The width of the quarter is selected according to the width of the extension, and the depth is about a centimeter.
- Cut the selected extension to the width necessary to cover the opening with the box. The vertical and horizontal strips are cut along the length so that the horizontal piece overlaps the vertical ones.
- We make the formwork around the perimeter from the wrong side of the box from flat material, for example, from drywall. For what its strips about the size of the width of the prepared finish, fasten the screws to the box.
- We align the vertical parts of the door frame with respect to the floor at an angle of 90 degrees.
- We put glue in the groove (any on wood or liquid nails), insert the extension, adjust it so that there are no gaps. From above, for the fortress, you can pull off parts of the extension with screws, be sure to drill holes with a thin drill for the entire length of the screw so that the canvas does not swell or crack. After which we leave to dry. Once dry, remove the formwork and mount the jamb.

You can do without glue. Laths are prepared in the same way. On the back side of the box, where the quarter is located, the plates are screwed on, additional pieces are inserted and fastened with short self-tapping screws.
If there is no groove, you can cut panels from the selected material with a width corresponding to the width of the overlapping opening. Collect the box from the add-ons and insert the doorjamb inside. This can only be done if the extension is thin, or if the distance for mounting the entire structure as an assembly allows, and the casing is wide enough to cover the mounting seam.
Methods of installing extensions on a mounted box is used when there is an already installed jamb with a door, and the box has a quarter for the extension.
Method One:
- This area is freed from foam and thoroughly cleaned.
- Using a tape measure and angle measure the distance from the recess in a quarter to the end of the opening, in several places around the perimeter.
- Cut along the length and width of the workpiece. They are inserted into the groove, and in this place the extensions are propped up in several places to the box, for example, with a thermotherm or pieces of hardened foam, polystyrene. Then they wedge so that there are no gaps and the extras are at 90 degrees relative to the plane of the door.
- Construction foam is applied only to the part that is in the place of contact. After the foam hardens, you can handle it all the slope. It is better to use foam with a small coefficient of expansion for installation. If there is no groove, then the canvas is slipped under the box, wedged and foamed.


The second method, which is used if it is not possible to put the extension on the foam, and the thickness of the extension allows you to drill through it:
- We make several holes in the bar. Three holes are enough in the horizontal bar, and four holes in the vertical bar. In place of the holes, with a drill of a larger diameter, we make recesses to drown the caps of the screws.
- Using a tape measure and angle measure the distance from the box to the edge of the opening. We cut the width of the extension to the largest size. Mandatory condition: the dimensions at the joints of one strip with another, that is, in the corners, must be the same.
- We cut out small, even, rectangular cubes from the material at hand and, in places of fasteners, palm them under the box. We drive the screws into the strips, attach them to the box, press them to the blocks and pull them with a screwdriver, making sure that there are no cracks in the joints. This can be done if the width of the extension is not more than 20 cm. In the same way, you can assemble the box before its installation.

The third way:
- A thin rail, such as a glazing bead, with a size of not more than 10/10 mm around the entire perimeter is nailed to the box. If there is no rail, then at a distance of about 5 mm from the inner edge of the box, screw the screws around the perimeter or hammer nails. The hats are cut off by a grinder, leaving the pins about a centimeter.
- Dobors are prepared above in the indicated manner, wedges are added and spacers are added between the side extensions in the place where the nails were nailed and from the floor to the horizontal extension. It is better to fix the extensions with masking tape from one wall to another through the opening. And in the same way they foam.

The fourth method - the crate of an open doorway:
- For this, whetstones are prepared no thicker than the gap between the opening and the box, or slightly thicker, but in this case, a line is drawn along the entire perimeter of the box at the same distance for reference. Any lengths, just not cracked during installation. The width from the box to the edge of the opening.
- Mounted on concrete and brick on dowels, using the construction level and corner. Extras are prepared in the same way. Fasten to bars on liquid nails. After drying, it can be foamed for sound insulation.
The fifth method:
- It is possible to fasten the extensions directly to the opening on liquid nails, if they overlap the mounting seam with their thickness. To do this, glue is applied to the opening pointwise. Take a bar meter - one and a half, apply to the slope and with a mallet level the plane. Fix with masking tape until dry.
- In order to fix the extensions to the box, you can use clamps. To do this, dobors are prepared in length and width, they are assembled from them, the box is applied with liquid nails, applied to the jamb and tightened with clamps until dry.


Telescopic
This kind of extras is assembled as a constructor. It is advisable to use a trimming milling machine. Without it, it is quite difficult to make cuts at 45 degrees, using a simple miter box for this. Therefore, when assembling the box at 90 degrees, it is necessary to ensure that the groove for the fitting at the junction is continuous. Dobors with a spike are inserted into it, on the one hand, and on the other, a groove into which the clypeus is inserted.
The depth of the groove is 15 mm, which makes it possible to "walk" in size in width when acquiring or fitting the finishing and cashing. The steps for measuring, cutting and attaching are the same as for straight planks.
Their convenience lies in the fact that they easily come together and make it possible to cover any distance.

Combined
The combined types of doborniks are angular planks made of fiberboard, MDF, PVC - they are both additional and cashing. Use this type of additional strips with insufficient overlap distance. Mounted mainly on liquid nails.
Dimensions
Standard sizes on the market:
- thickness is 6-30 mm,
- width 50 -250 mm,
- length 2100 mm.

The width of the telescopic panels is 90, 120, 150 mm. The quarter on the box for completing is most often 10/10 mm, so the thickness of the strap is chosen 1 cm.
The required width of the strip is the width of the opening minus the width of the door frame, plus a quarter, if any. Additional boards can be prepared with your own hands. Such an item of custom sizes can be made to order.
Forms
In most cases, the extensions are in the form of a flat panel. If necessary, you can make an extension in the form of an arch. Often, various accessories are added to the decor, for example, in the form of stucco moldings. The column-shaped slope looks interesting.


How to choose?
An additional board is selected according to the color or pattern suitable for the door. As a rule, this is one and the same material, everything is done in the same color and in one piece. But modern designers can sometimes experiment: they highlight platbands with darker tones or brighten the whole slope.

How to replace?
Unclosed space remaining free after installation can be plastered, after which the wallpaper can be painted or glued. But due to the intensity of use of the doorway, these places will become dirty or subject to random mechanical influences. To avoid loss of appearance, you can put metal extension.
Plasterboard and a wall panel are also used, tiles are laid, foam rubber is glued and covered with fabric.
For more information on how to install do-it-yourself, see below.
Reasons to install trims
Door extensions are needed in those cases when the premises were too wide openings.
To make it more clear, we give an example. The width of the wall is 200 mm. 70 mm of them will be blocked by a box and 130 mm will be closed by extension. We add 20-30 mm for the groove and we get the required size of the strip (150-160 mm). An additional element is needed only if the platbands are planned from two sides: internal and external.
Refining the doorway with dobers is a relatively new trend that is gaining popularity. When considering how to expand the door frame, it is better to use specially prepared trims. Since the existing platband will not hide the empty wall. Dobors are available in different widths and lengths, so they will completely close the space between the slopes and the door leaf.
Materials and design features
Depending on the form and method of attachment, the types of extensions can be as follows:
- Standard. They are flat strips that are attached with glue or nails. Its main advantage is the ability to fit one or another element directly during installation. The board is with or without an edge.
- Telescopic extension. A distinctive feature of this building product is the presence on both sides of special longitudinal grooves. They perform the function of fasteners and are mounted on the principle of "tenon into the groove." Its width is adjustable with the help of a sliding bar, which can exit the slot by 2–7 cm. The positive qualities of these models include ease of installation and aesthetics. This type of strips is distinguished by reliable and tight fastening. They are faced with walls of any thickness.

They make elements from a variety of materials. Depending on the raw materials used, the doors for interior doors can be wooden, plastic or MDF.
Wooden dobore is produced, as a rule, from natural wood. Use ash, beech, oak and conifers. An additional beam happens edged or grooved. It is imperative that the door leaf and the additional element be made of the same material. This will avoid visual dissonance.
Extension from MDF is the most sought after. It is lightweight, resistant to mechanical damage and ease of installation. It is made from a fine fiber fraction, and on top is covered with a laminated film or natural veneer. Such add-ons will be a good complement for both wooden doors and hollow door leaf.

Items from PVC or simply plastic door extensions can be attributed to the number of budget options. They have a low cost, are simply mounted and do not need additional maintenance. Most often used for entrance doors.

How to choose the additional elements
The first thing you should pay attention to when choosing a material for additional products is their compatibility with the door leaf. As mentioned earlier, for reliability and harmonious design, they must be made of one raw material. It is best to purchase items with doors.
It is extremely important and the quality of the selected material. The plank should not have any chips and cracks. A smooth and smooth surface without defects indicates good product quality.
If your choice fell on telescopic extensions on interior doors, then in this case, you first need to make sure that there are fasteners. These should be special factory grooves, the shape and dimensions of which are individually selected for all interior doors.

It is worth taking into account the price-quality ratio of the selected product. It is best to give preference to trusted brands and manufacturers. Cheap counterparts are unlikely to be high quality.
Before buying a product, you need to accurately calculate how many additional elements you need. As a standard, 2.5 slats are installed on the door.
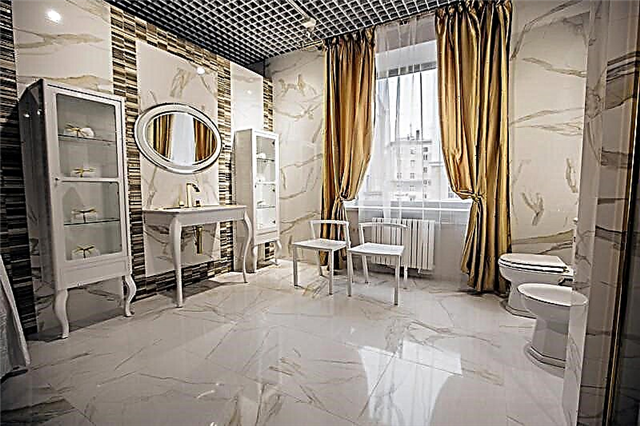
Extras for the interior door: what they look like and why they are needed
Dobory (additional boards) - these are wooden planks or MDF panels, which cover the door slopes. Such slopes are formed if the wall thickness is greater than the width of the door frame. As a result, the box does not cover the entire end of the wall and bare concrete or broken bricks are visible. Sometimes this section is plastered, pasted over with wallpaper, covered with plastic, but it is easier, faster and more aesthetically to install additional elements.
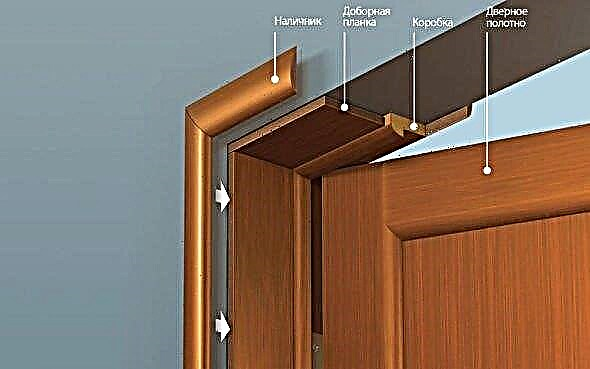
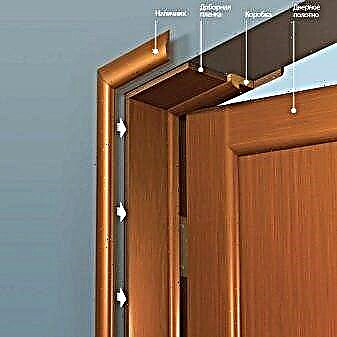
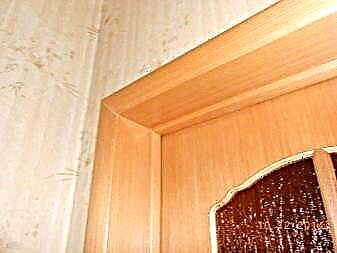
The design of the door block with the use of extras
Unlike ordinary slopes, doborny boards, as it were, continue the missing width of the box itself, forming a single structure with it. In order not to be mistaken with the tone, dobro buy at the same time with the door leaf and cashing.
Benefits of using
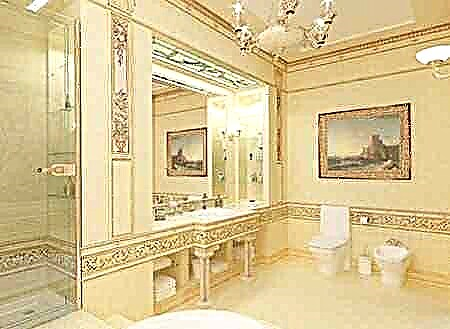
- Correctly installed extensions look presentable and, depending on the overall style decision, bring an element of wealth and luxury or restraint and solidity to the interior.
- Dobors are fastened simply and quickly, which saves time, effort and money.
- During finishing work, the door unit does not come into contact with wet solutions, which prevents its soaking and spoilage. The life of the door is increasing.

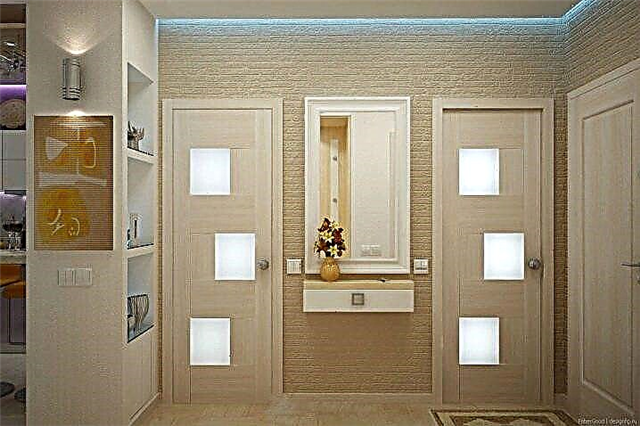
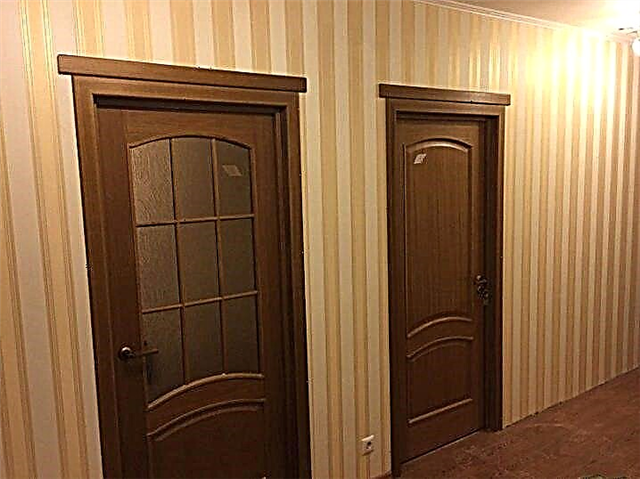
The finished design looks beautiful and modern
Types and sizes of add-ons: selection tips
Dobory you can make yourself or buy ready-made. The store will offer additional trims of standard sizes:
- length - 2.1 m,
- width - 7–25 cm,
- thickness - 6-30 mm.
To calculate the width of the additional strips, the depth of the groove in the box is added to the width of the slope, or the width of the box is subtracted from the thickness of the wall taking into account the groove.
With especially thick walls, the width of the extension can reach 40 cm or more, but such trims are made to order. The thickness of the additional strip should not exceed the width of the groove in the door frame.
Based on the design features, additional strips are divided into:
- ordinary
- ordinary with edge banding,
- telescopic.
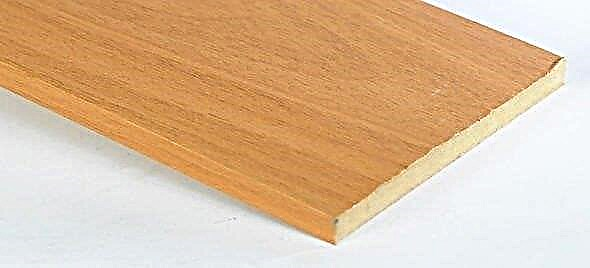
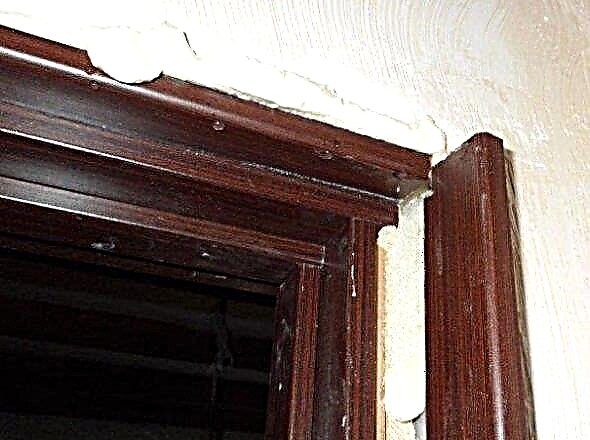
The simplest option is a straight strip of wood fiberboard (MDF) or laminate without facing edge. Many masters believe that sticking a facing edge on the ends is an extra waste of time and finances. After all, one end fits snugly on the door frame, and the second will be closed by a platband. But in this case, the installation must be done with special care, because a deviation even by a couple of millimeters will be given out by the novice master: the gray rough edge will be striking.

The simplest add-on is an ordinary bar.
If, however, the end face is pre-closed with an edge tape selected in tone to tone, minor flaws will be invisible. The edge itself is worth a penny, and you can stick it in a few minutes using a regular iron. This method is also preferable because the edge banding prevents the MDF-plate from swelling under the influence of moisture. This is especially true for door units in kitchens and bathrooms..
A more perfect additional strip is distinguished by the presence of an edge at the ends
The most complex construction of the telescopic extension. Its feature is the presence of special grooves that allow installation without the use of screws and nails. Moreover, it is almost impossible to miss: the extension fits perfectly with the box and platbands. The width of the extension is regulated by the depth of the groove. To make a telescopic extension yourself, you will need certain skills and a special tool. It's easier to buy ready-made trims.
The telescopic door extension has special recesses
Necessary tools and materials
When installing add-ons, the minimum set of tools is used:
- level,
- roulette,
- pencil,
- saw or jigsaw,
- plane,
- hammer,
- sharp knife.
- polyurethane foam,
- fasteners (self-tapping screws, nails or “liquid nails”),
- additional levels.
As a rule, dobras are bought together with the door leaf, but if the doors are not going to be changed, and they plan only to close the slopes, they are used to make the dobors:
- wooden planks
- pieces of MDF,
- long chipboard trimmings,
- plastic.
If natural wood is used, it is pre-treated with antiseptic impregnations to extend its service life.
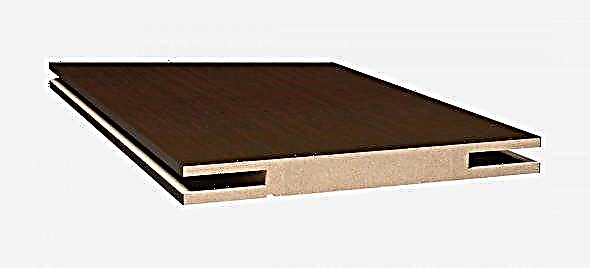
Home-made add-ons from ordinary MDF will differ from factory ones, since in industrial designs the inside between two thin wood-fiber boards is filled with cellular material.
Chipboards lose to wood and MDF in appearance and durability, but indoors, particleboard add-ons can be used.
Plastic as a material for the manufacture of additional materials is rarely used. And if it is still used, then especially durable, metal-reinforced PVC panels are selected.

Extras can be made of natural wood, particleboard, MDF panels or plastic
Groove installation
If you plan to use extensions, then it is better to buy a door frame with a special groove. The presence of a groove not only speeds up the installation process, but also allows you to extend / retract the additional bar deep into the box by several millimeters, which increases the accuracy of installation.
- It is assumed that by the time of installation of the add-ons, the door frame is already fixed in the doorway. Therefore, first measure the distance from the door frame to the edge of the wall. All slopes are measured separately and each at least at four points. As a rule, these indicators differ: even if the box is installed strictly vertically, the wall itself may turn out to be uneven.

It is convenient to make measurements with a construction square

Additional strips are bought with a margin of width, and an exact fit is made during the installation process

The design of the door unit using conventional extensions

When mounting telescopic extensions, the spike into groove method is used

The upper extension lies on the side at a right angle

The gap between the wall and the extension is filled with foam
The use of foam during installation allows you to do without nails and screws
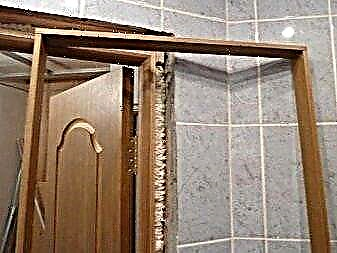
Installation without groove
If there is no special groove in the door frame, the extensions are fastened end-to-end. Such installation requires very accurate (up to a millimeter) measurements, careful fitting of additional strips and special care during installation.
- Measure the width of the slopes in the same manner as when installing the extensions in the groove.
- Trim additional strips to the desired size. If there are excess millimeters left after sawing, they are cut off with a plane.
- An edge tape is glued to the obtained sections. For this, the edge is ironed with a hot iron, as a result of which the glue on the back side is melted and the tape is firmly attached to the bar.
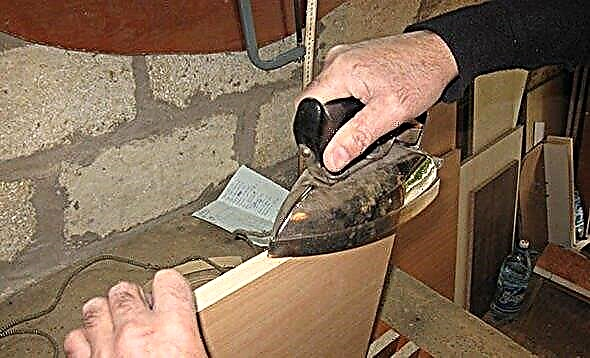
The edge is glued with an iron

Nails are driven into the butt end and bite off the hats

After installing the extensions, the nails are not visible
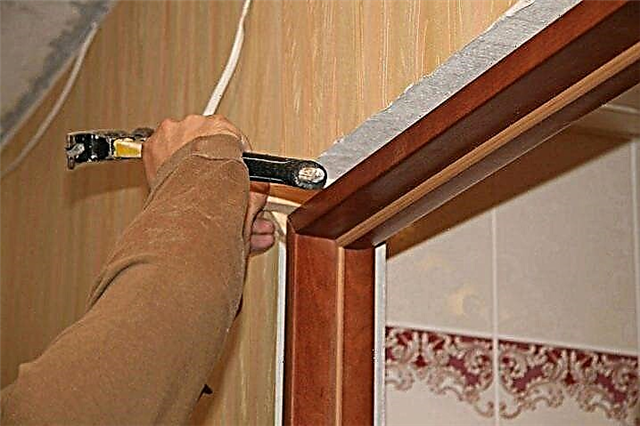
Installation of platbands
After the add-ons are installed and the mounting foam has dried, the platbands are fixed.
- Measure the height of the side strips. To do this, add the width of the upper platband to the height of the doorway.

The length of the vertical clypeus is calculated taking into account the width of the horizontal
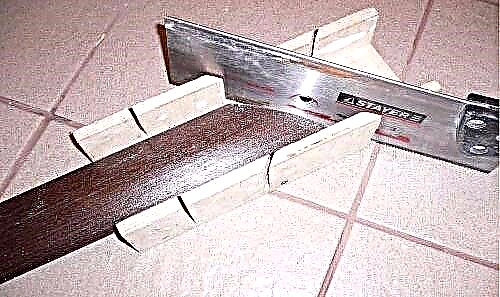
Cutting the platband at an angle of exactly 45 degrees will help the miter box

Marking is best done on site

The ends of the clypeus are filmed in mirror image
It is advisable to bite off the hats on nails. So they will be almost invisible
If self-tapping screws are used instead of nails, then a hole is first drilled into which the head drowns. Then they are screwed, and the caps are closed with special plastic plugs.
Below platbands reach the floor. There is no clearance for the baseboard.

Skirting only adjoins platband