Posted by: Avtor 0 3,422 Views
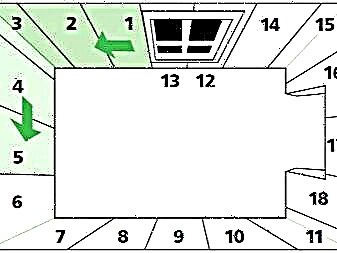
Where to start gluing wallpaper? Not everyone is ready to answer this question. Such information is very necessary when performing repairs in the room, especially when wallpapering on the walls. Once upon a time, this finishing material was glued with an overlap. The work looked beautiful and even. Each roll of the canvas had a narrow border without a pattern. It was cut from one edge and the canvas was glued to the previous one. Such work required to start gluing wallpaper only from the window. So the joints were less visible.
How wallpapers are glued today
Modern building decoration materials in the form of wallpaper can be found on the shelves and windows of any specialized store in huge numbers. You can choose any colors and materials for the manufacture of products. If desired, it is easy enough to purchase traditional paper wallpapers, original non-woven or vinyl. How to glue wallpaper in modern apartments? Modern technologies recommend doing this butt. With this technology, there is no question of where to start gluing wallpapers correctly. Work starts from anywhere in the room, but most often a window is taken for the starting point.
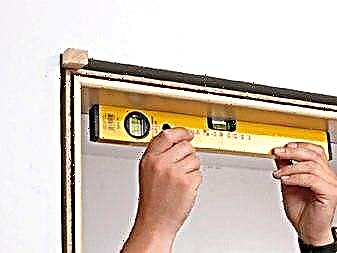
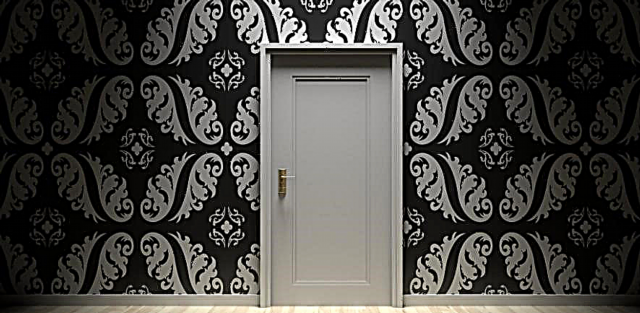
Many begin to glue wallpaper from a window out of habit. And any window has vertical slopes, from which it is easier to lay canvases. The same straight vertical lines can give doors and corners in a room. But it’s hard to find an apartment with even angles. Their curvature is visible even with the naked eye. Precisely determine the evenness of angles using the construction level. If the straightness of the corner is confirmed, you can start pasting from it. With a straight and straight door jamb, you can select it as the starting point.
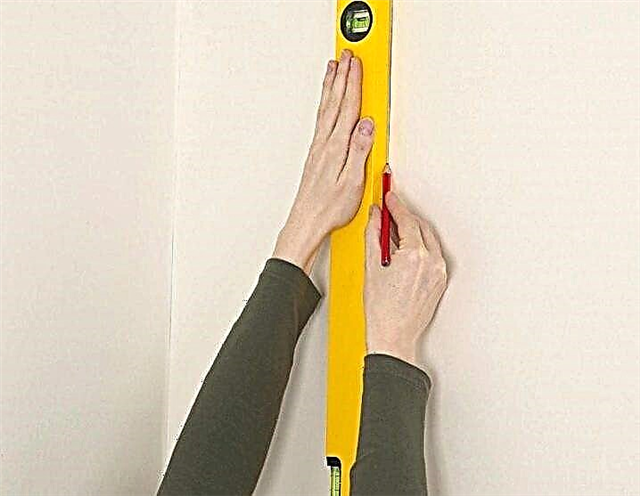
Where to glue wallpaper in a room with even angles? The beginning of the work can be considered any of them. The main thing is that the vertical should be perfectly flat. If the initial web adheres evenly, all others will be even. The previous canvas is a vertical line for the next segment of wallpaper. A line can be drawn using the level anywhere.
From her wallpaper glued in a circle. When the circle closes, there may be problems associated with the joining of patterns. This situation can be eliminated only by choosing for each wall its own vertical line. The last canvas of the previous wall when gluing should capture 2-3 cm of the next. On this strip and draws a vertical line for the next wall.
By the described method, only paper thin products can be glued. Stickers with thicker non-woven or vinyl coatings require a sharp knife. On an overlap of 5 cm, a vertical line is drawn on the next wall and cut with a knife. The next web is glued butt to cut.
Wallpapering in practice
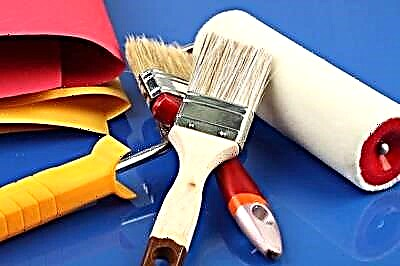
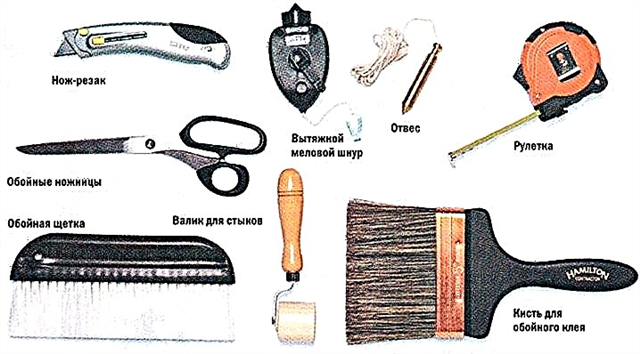
Where to start gluing wallpaper - this question interests only those who intend to clad a room on their own. If masters are hired, then they themselves know everything. To work, you need to measure all the surfaces of the walls and purchase the right amount of materials. The materials themselves include wallpaper and special glue to them. The number of rolls should be slightly more than necessary. Depending on the width and color of the paintings, this figure can reach up to 15-20%. It is impossible to work without a tool.

Be sure to cook:
- glue container
- scissors cutting cloths
- marking pencil
- glue brush
- putty knife,
- roulette,
- plumb bob
- rubber roller
- sharp knife
- wallpaper rolls
- finished glue or dry mass for dilution.
Before performing work, you need to prepare the room. To do this:
- remove all furniture and equipment from it,
- cover the floor with foil
- clean and level the walls,
- to process the surface of the walls with a primer.
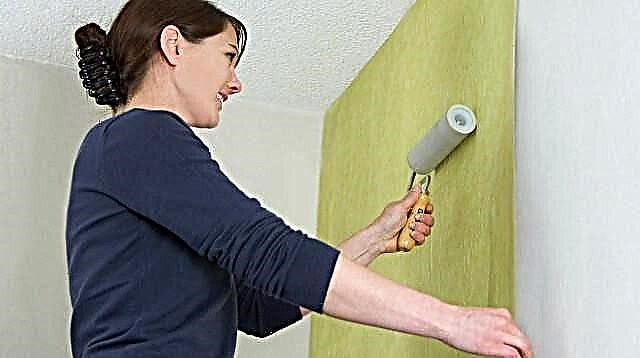
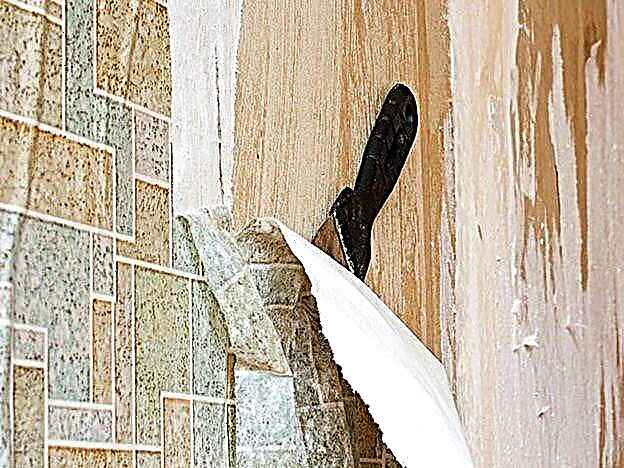
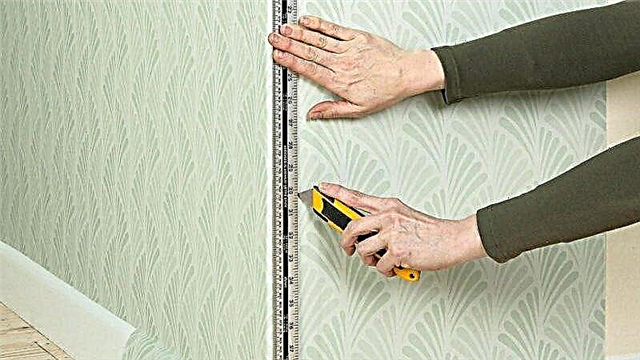
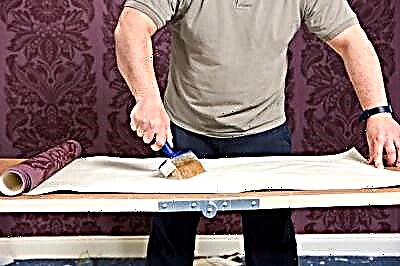
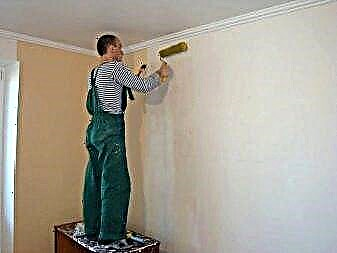
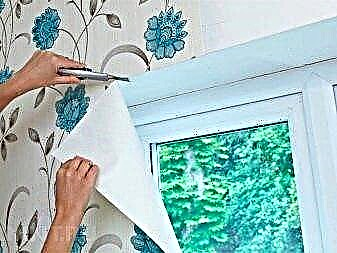
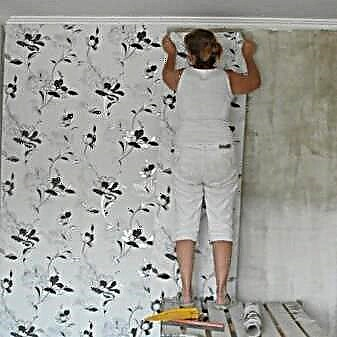
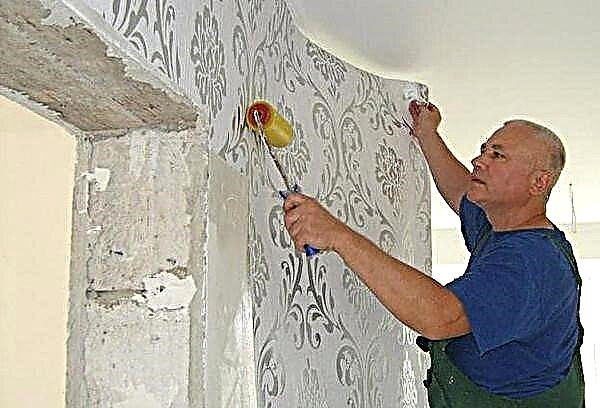
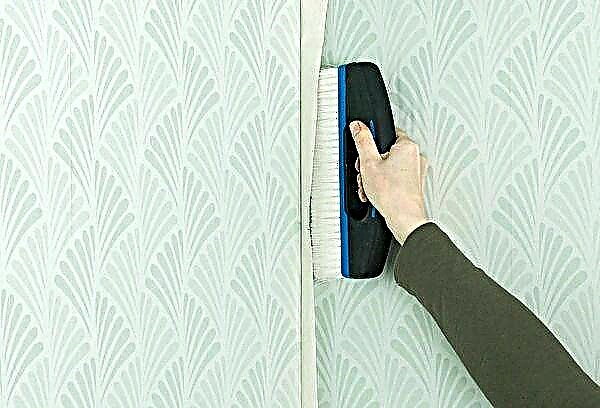
Next, a roll is taken and a floor-to-ceiling canvas with a small margin is cut from it. You can measure this distance with a tape measure or with the canvas itself. A sheet or wall is lubricated with pre-prepared glue (this is written in the instructions for using the wallpaper) and left for some time to swell. When gluing, bend the lower edge. It should not lie on the floor. The sheet is applied to a vertical line and pressed. With a brush and roller, the material is smoothed out until air bubbles are completely removed from it (photo No. 4).
The reference point can be any vertical line at the window, in the corner, at the door, anywhere on the wall. Start decorating the room by sticking the canvas along this line. The remaining canvases are glued to the previous butt until the circle is completely closed. Canvases with a large pattern should be precisely adjusted to each other. Here, you will need an acquired stock of 15-20%.
Conclusion on the topic
Sticking wallpaper with your own hands is a test of your skills, nerves, understanding with your partner, which will lead to a changed appearance of the room. What it will be is up to you. For proper operation, you need to purchase high-quality wallpapers and adhesives. About the methods of gluing the finishing material must be read in the instructions for the wallpaper. If the wall surfaces in the house are not very even, it is better to stick non-woven products for painting. With them, you can change the interior of rooms 15-20 times, applying various colors without plywood.
Do not start pasting from the corner opposite the door. It is in this angle that the gaze of the person entering the room is directed. All flaws will be visible to him. Gluing wallpapers is quite easy and simple, if you follow the recommendations of specialists. The skill of work comes very quickly. Before starting work, remove covers from sockets and switches. Cloths are glued onto the resulting holes with boxes and cut crosswise. Corners can be turned inside and put the covers in place. This is done on dried wallpaper. In the same way, the dried lower and upper parts of the wallpaper are cut off on a steel ruler or on a spatula.
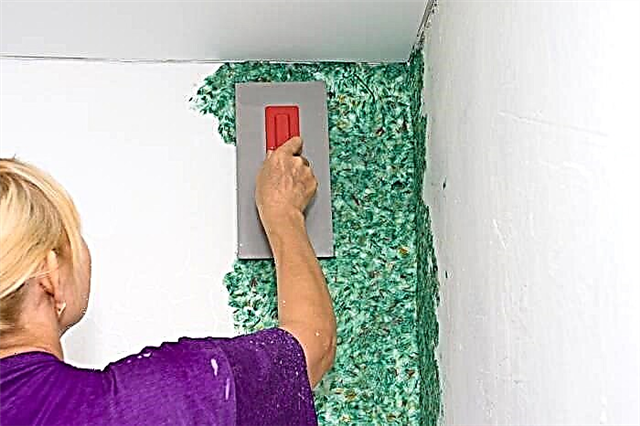
You can apply liquid wallpaper without any cracks and joints on the walls. They are suitable for any room. A dry mixture of cellulose and adhesive is mixed with water and applied to the surface using the plaster method. After drying, a soft surface resembling a fabric appears. A combination of several types of coating is also allowed, sticking them not in the vertical, but in the horizontal direction. In this case, the joints are closed by gluing decorative elements. Their functions can be performed by moldings, borders, wood panels, decorative cords.
The joint in the corner can be repaired in this way: cut a narrow strip from the canvas and stick it in the corner. Entire canvases are pasted onto it. The joint remains in the middle and becomes invisible. In the corner, the wallpaper material may wrinkle. What to do in this case? A bubble in a shriveled place just needs to be cut with a sharp knife. The cut parts are lubricated with glue and superimposed on each other. The main thing in the work is not to rush. Otherwise, everything will have to be redone.
Wallpapering in the room: preparatory work
If you decide to carry out repairs yourself in the house or apartment, even if it is just cosmetic repairs, you must clearly determine the sequence of actions performed. First of all, you need to properly prepare the room. The preparation phase includes:
The preparation stage includes: purchase of wallpaper, selection of tools, flooring, cleaning the walls
- the acquisition of materials (wallpaper, glue, primer, edging, tools),
- selection of the necessary tools (scissors, tape measure, construction knife, brushes, roller),
- flooring with protective material,
- preparation of walls and communications.
Care must be taken in advance to acquire materials. It is necessary not only to calculate the amount of decorative finishes and glue mixture, but also to take care of how to apply glue to the walls when wallpapering. The floor is most conveniently covered with plastic wrap, and simple newspapers are also suitable. For security reasons, it is better to turn off the electricity, and for convenience, you can remove the lamps and outdoor boxes from sockets. The room should be as spacious as possible, therefore it is advisable to move the furniture out or move it in the center and cover it with foil.
The glued surfaces require special careful preparation. Walls and ceilings must be cleaned of the old coating. Putty, leveling and priming of surfaces should be carried out. Before starting work, the room must be carefully ventilated, and then tightly close the windows and doors to prevent drafts.
On the floor it is necessary to allocate a special place for marking and cutting the paintings, as well as for lubricating them with glue. The features of wallpapering of various types and in different rooms will be discussed in this article.
Walls and ceilings must first be cleaned of the old coating
Preparing walls for gluing
How to glue the wallpaper so that the result does not disappoint? A good start is half the battle: before gluing, you must carefully prepare the surface: it must be perfectly even, white, cleaned of litter and dust. The main rule is that it is impossible to glue wallpaper on curved walls, but for alignment it is better to invite specialists. Plaster is applied to uneven areas.
If the walls are oil, water-based paint or old wallpaper - before you stick new ones, you have to work hard.
Is it possible to glue new wallpapers on old ones? Many experts advise against this. To remove the old paper coating, just walk with a wet roller or a rag with soapy water. After 10-15 minutes, the paper will easily separate from the walls.
 The process of removing old coatings
As you can see in the photo, the old coating is not always possible to remove completely. Residues are re-wetted and removed with a spatula.
Removing old paint
Is it possible to glue wallpaper on sanded and primed oil paint? Professionals do not advise doing this: there is a high probability of delamination. Oil paint is removed mechanically or using special chemicals. The lagging paint is removed with a spatula, and then options are possible.
Removing paint with a hammer and chisel is a laborious and lengthy process, but relatively environmentally friendly. More often, a grinder with metal brushes or a perforator is used to remove old paint. The disadvantage of this method is the large amount of dust that will settle for several days. Together with the paint, part of the concrete base is removed - as a result, the surface is dotted with bumps, and it has to be putty well.
To remove only the paint, washings are used. Removing paint using special chemicals is carried out in two stages: washing is applied to the surface, and then the softened paint is cleaned with a spatula.
To stick wallpaper on walls covered with water-based paint or whitewash, it will have to be carefully removed with water and a scraper. Hot water will simplify the task.
Wallpapering the walls can only begin after the complete removal of previous finishing materials, the correction of uneven areas, finishing putty and sanding
The importance of these steps cannot be underestimated: proper preparation is the key to an excellent result.
What is needed for this?
Almost all types of work require preparation, wallpapering is no exception. First you need to do the walls and buying. Need:
- remove old layers
- remove paint stains
- level the surface
- buy the required number of rolls.
Measure the height and length of each wall. Do not forget about windows and various ledges, for example, sockets. They also need to be measured. It is best to take a calculator to the store to more accurately calculate the required number of rolls. The pattern printed on the roll should also be considered. After all, it will not be very beautiful if any element is not fully depicted.
Important
Before starting the repair, it is necessary to completely disconnect the room. Since glue or water may cause a short circuit.
It is also worth insulating the wires in outlets for the same purpose.
Some tools may be needed for wallpapering. Since the walls and coverings are different for everyone, the list can vary greatly. However, most often needed:
- glue container
- putty knife,
- roulette,
- a knife, better clerical,
- meter line (more possible)
- electric drill with a whisk.
It is necessary to prepare everything you need in advance, so that you don’t run and look later. After all, repairs should take place in a relaxed atmosphere.
Where to start gluing wallpaper in the kitchen - options
Even 1-2 decades ago, wallpapers were glued exclusively with an overlap. Manufacturers even made a special thin strip on one edge, on which the next sheet was glued. Today, such a strip on the wallpaper is no longer done, and most types of wallpaper are glued butt. How to decide which gluing method to apply to you? It depends on the wallpaper purchased: thick glues butt, thin - with an overlap.
The docking option for gluing involves gluing from a window or door. But from the corner, gluing in this way is better not to start - perfectly even corners in apartments are rare, and the difference in the junction of the paintings in this case will become noticeable at times. You can start gluing from the corner only if it is planned to put high furniture or appliances (cabinet, refrigerator) in this place.
The secret to lapping wallpapers: move away from the window. In this case, the overlap will not be emphasized by the light from the window and will remain less noticeable.
From the window
This method is considered seamless, since it allows you to hide the junction of the paintings. He came to us in the days of the USSR, when the windows were the most important landmark in the apartments. In addition, it is convenient because of the ability to hide flaws with a curtain, behind which you will have to glue the remaining strip at the end of the work.
The disadvantage of such a sticking: if there is not enough wallpaper, and the store does not have the necessary rolls, you will have to re-glue the whole room. If you start from another point, with a lack of wallpaper, you can get out of the situation, for example, by pasting other similar wallpapers behind the radiator, where the difference will not be so noticeable.
From the door
The times when the window was the only even reference point in the room have long passed, and if the house is not built during the times of the USSR, you can rely on the doorway when wallpapering. But in any case, it will not be out of place to check the vertical at the door with a level or plumb line so that the following canvases are glued evenly.
From the corner
The corner is the most inappropriate place to start wallpapering. This method is resorted to if a panel is planned on the wall or if the opposite walls want to be glued equally. Also, wallpaper starts to stick from the corner if the window and doorway are obviously skewed and cannot act as a guide.
When choosing this method, start gluing not directly from the corner, but slightly backing away from it (2-4 cm will be enough). It is better to determine the vertical using a plumb line or level, draw it on the wall and stick the canvas, focusing on it. This will help to glue the corner beautifully and evenly and provide a strong gluing of wallpaper and wall.
From multiple lines
If you have many helpers, and while you are gluing one wall, someone is gluing the second at this time, you can use the method of pasting from several lines. In this case, the joint is made over the window, and the wallpaper “meets” over the door. Or vice versa: start work from the door, finishing gluing over the window. In both cases, the joints will not be so noticeable.
And a few more tips:
- If you can not decide on a landmark, it is best to start pasting from the largest object: an arch, a window, an aperture, a built-in wardrobe.
- With the chosen bright print on the wallpaper, start from a place where the joint will be less noticeable, otherwise it will be striking every time.
- If you hide a junction behind furniture, think about whether you plan to move or change the headset.
- Do not cut the roll into several identical parts at once. The height of the walls can vary, and it may be necessary to cut off somewhere, and somewhere, on the contrary, glue the missing pieces, which will ruin the appearance.
- Vinyl, non-woven and cullet do NOT overlap.
- When overlapping, masters advise moving from left to right.
- You can save part of the wallpaper in the area of the kitchen apron - there is no need for pasting.
Where to start gluing wallpaper in the kitchen, taking into account the specifics of the room
Features of the kitchen room complicate the process of wallpapering a little. Here you should consider the following nuances:
- the need to equip the kitchen with household appliances,
- space for a kitchen apron,
- registration of the location of the door and window,
- division of the premises into working and dining areas.
For the kitchen, the most suitable wallpaper options are vinyl or special canvases for painting. The ability to change the color of the wallpaper and the large width of the rolls are the main advantages of paintings for painting. Through the use of different types of products, you can successfully zon the kitchen.
The order of the work itself is practically no different from the process of gluing paintings in other rooms. Wallpaper should be glued with high quality, as the walls in the kitchen are subject to increased effects of temperature and humidity.
For the kitchen, the most suitable options for wallpaper - vinyl or special canvas for painting
Reliability of fixing will help to ensure certain rules of sticking. To do this, apply glue to the wrong side of the wallpaper, then wrap the edges in the middle and fold the strip again. For 10-15 minutes, the glue is well absorbed into the surface, after which you can proceed to gluing. The first strip is applied to the vertical mark and smoothed using a roller or rubber spatula.
Meter
Meter wallpaper is more difficult to glue, but you can avoid a large number of seams. Now they are more popular than narrow ones. The main rule for sticking wide wallpapers in the corners is this: the width of the approach should not exceed 5 cm
No need to save wallpaper and glue the entire canvas, otherwise the result will be unsatisfactory
The main rule for sticking wide wallpapers in the corners is this: the width of the approach should not exceed 5 cm. No need to save wallpaper and glue the whole canvas, otherwise the result will be unsatisfactory.
- The angle is leveled with a plastic spatula or a clean, dry cheek with a rough pile.
- At the narrowest point of the inlet, at a distance of 1 cm from the edge of the wallpaper, a mark is placed along which a vertical line is drawn.
- The next canvas is glued with a reference to this line.
- Surpluses are trimmed according to the already known pattern with a construction knife.
Vinyl
Vinyl wallpapers, unlike non-woven ones, need to be pre-coated with glue. The procedure for pasting corners is simple and straightforward. How to glue the vinyl material:
- The size of the canvas should be subject to a 5-centimeter overlap on an adjacent wall.
- The canvas of the desired width is well smeared with glue, left for 10-15 minutes.
- The corner must be pressed, remove all excess glue and air, walk with a roller or spatula from top to bottom.
- The next sheet is overlapped and also firmly pressed against the wall.
- Then you need to take a construction knife and draw a straight line along the steel ruler, preferably from the bottom up on two layers of wallpaper.
- The top layer of wallpaper is carefully moved away, and the allowances of the previous canvas (5 cm) are removed.
Important
The canvas returns to its place, it is carefully ironed with a dry cloth or rubber roller from top to bottom. It should get a smooth junction.
We calculate how much wallpaper you need in the kitchen
In order to calculate how many rolls of wallpaper you will need for pasting the kitchen, it is important to carry out mathematical calculations. You can calculate everything yourself, or use an online calculator on the Internet (for example, this)
Consider an example of self-calculation. Let's say we have a room measuring 6x4 m and a height of 2.5 m.
- Measure the perimeter of the room and subtract from it the surfaces that will not be glued: windows, doors, an apron, built-in wardrobes (if any). (6 m + 4 m) * 2 = 20 m.
- Divide the resulting number of meters by the roll width (0.5 or 1 m). Get the number of stripes. 20 m / 1 m = 20 lanes.
- Measure the height of the walls, add a small margin for the cut (about 5 cm). 2.5 m + 0.05 m = 2.55 m.
- Count the number of stripes per roll. For example, a roll of 10 m. 10 m / 2.55 m = 3.9 m. In this case, only 3 full meters are taken into account.
- Now divide the number of strips you require by the number of strips per roll. 20 p / 3 p = 6.7 rolls. Round to a full roll. Total, 7 rolls will be required.
Keep in mind that when fitting a picture, more wallpaper is consumed. For an approximate calculation, you can use the above formula, adding an additional 40 cm to the height of the room. That is, in our case, we must take into account not 2.5 m, but 2.9 m.
Start point criteria
In order for the wallpaper to be glued evenly and neatly, you need to position the first canvas as evenly as possible.
Thus, the room is glued in a circle. The starting point is the first piece.
In the event that inaccuracies were made during the gluing process, the last web will not converge with the first.
In this regard, it is very important to choose the ideal vertical reference for gluing the first piece
It is important to make the right measurements.
First of all, you need to choose the type of wallpaper, calculate their desired amount and select a specific glue. All this can be done directly in the store, contacting sales consultants for help.
Usually, the following tool is used in work:
- glue dilution container,
- scissors,
- brush and pencil
- putty knife,
- plumb line and tape measure
- rubber roller.
- Wallpaper in the room glued in a circle - from point to point. The place to start work in this case is the very first canvas. However, if you act in this way, in the absence of experience it is easy to make inaccuracies, and the last piece may not coincide with the first.
- The last strip of wallpaper often does not fit the whole, which means that the picture may not converge. Therefore, it is better to choose the start point of the sticking in an inconspicuous place.
To stick the wallpaper neatly and evenly, you will have to carefully work with the first canvas. If it is glued somehow, the remaining stripes will also lie crookedly. We need a straight vertical line for the first strip of wallpaper, since when gluing the next stripes it will become a guide.
Tools with which help determine the evenness of the desired landmark:
- The construction level is a simple and affordable fixture. The longer it is, the better the performance.
- Plumb - suitable for vertical lines.
- The laser level is an expensive, but the most accurate and convenient tool.
An important factor in determining the type of wallpaper is the purpose of the room, as well as the condition of trimmed grounds. In dry rooms, with even surfaces, any kind of canvas can be used. In humid rooms and the hallway, it is more appropriate to glue washable wallpapers, for example, vinyl.
Qualitatively hide the small irregularities of the walls being trimmed helps their decoration with embossed wallpaper with a dense ornament, a large cell. Dry rooms, such as bedrooms, living rooms, children's rooms, can be pasted over with any kind of wallpaper.
On the surface, with minor mechanical damage should be glued fiberglass wallpaper. Non-woven finish is not subject to shrinkage, perfectly hides small irregularities. It is easier to work with them, because according to the technology, glue is applied only to the wall.
However, there is one way to visually make uneven corners unnoticed. To do this, use a new vertical line when gluing each of the walls. Due to this, the sheet will go just a few centimeters to the next strip.
Such an imperfect joint will visually hide uneven corners and preserve the aesthetics of the selected wallpaper design. You also need to consider the natural lighting of the room, since unsuccessfully falling sunlight can visually highlight the joints.
Typically, a doorway can be selected as the starting point, because door replacement occurs more often than window replacement. During the replacement of the loot, it is necessary to observe a strict vertical so that the door stands perfectly straight.
If the corners of the room are perfectly even in your house or apartment, you must also make sure that the wall products are glued correctly. A single sheet of wall covering cannot simply be glued to the corner of the room.
This is fraught with the appearance of free space between it and the wall, which in the future can cause its mechanical damage (as a result of which a hole is formed). The right decision will be to use several sheets, while this will take a little more time, but the result will be better.
If the pattern is made in the form of all kinds of stripes and other geometric elements, even with perfectly even angles to dock it is quite a difficult task. It is necessary to strictly adhere to an upright position and not allow moving out. Only in this way can the drawings of the first and last strip be docked.
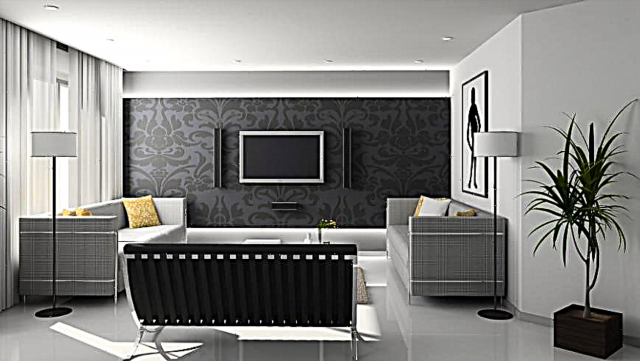
We combine wallpapers
The wall covering, combined from different components by color or texture, creates a unique design. With the help of different drawings, a spectacular zoning is carried out in the room. It can be performed horizontally, vertically, in the form of inserts. The niches made by zoning, the framing of fireplaces and other freestanding furniture look spectacular. Zoning allows you to divide the room into several separate corners. By combining the wall decoration of the room, you can visually resize the space. This is true for elongated rooms, small rooms, rooms with low ceilings.
When combining often use two types of roll materials. Darker canvases are glued to a height of about 1.2-1.5 meters from the floor, lighter ones go higher. The texture of the canvas can vary from a denser bottom to a light top. You can apply wallpaper according to previously made markup from the bottom or top. Joining places of different types are reliably hidden by suitable moldings.
How to glue wallpaper in the corners of the room?
There are several ways.
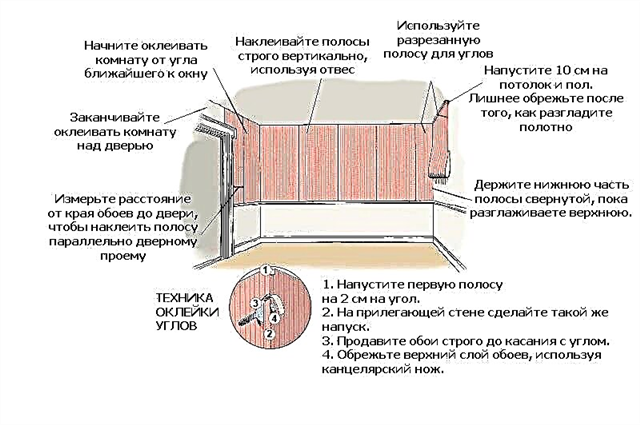
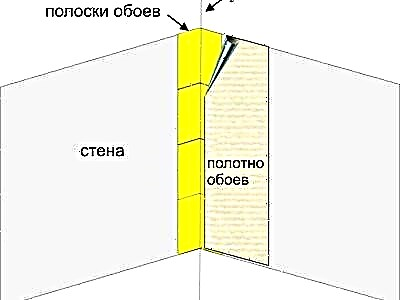
Method 1. One glued web is wrapped at an angle, so that on the adjacent wall a strip about a centimeter is obtained, as in the diagram.
 Layout of paintings
The second web is trimmed so that the edge exactly hits the corner. At the joints pass a narrow roller. If you do the work in this way, overlaps may be visible.
Method 2. So that even the thickest wallpapers look neat at the corners, both canvases are glued, going to the adjacent wall by about 2 cm. Then, both extra strips are removed with a cutter: for this, a wide spatula rests against the corner, which is gradually shifted until the laps will be cut off completely.
Why is it important to choose the right one?
Before purchasing this finishing material, you need to take into account a large number of nuances that will later help to translate the ideas into high-quality repairs:

- It is necessary to decide whether you will carry out repairs yourself or a highly qualified team will do it for you. In the second case, no problems should arise, and the only concern is the choice of wall coverings. It turns out that for the quality of work you will have to pay a certain cost. Specialists will independently choose the appropriate option for gluing and, using all the necessary materials, will update the design of your room with new wall coverings as soon as possible.
- If you decide to do the repair yourself, you need to choose the right products, have in your arsenal a complete set of necessary tools, choose the right landmark and much more. We’ll talk about this now.
Every day, people are becoming more attentive to the repair work in their home. In the twentieth century, the vast majority of Soviet citizens pasted wallpaper on their own, using only one method - overlap. This option recommended starting from the window and running one lane a little on the other. The produced canvases already had this strip, where the subsequent sheets should be glued. A feature of this method was lighting, because it was thanks to him that such overlaps remained almost unnoticed.
Also, overlap gluing was very popular due to the fact that the window cuts were the most even, and this automatically made them reliable landmarks. Even today, this method is very popular, however, progress does not stand still and a number of other methods are presented to choose from.
The choice of starting point in most cases depends directly on the apartment itself
If we compare modern buildings with houses from the USSR, we can see that in our days they began to pay more attention to the strict verticality of window and door openings. Special devices (level and other tools) allow you to check how vertical the openings in the house are

Thus, the conclusion suggests itself: the smoother the window or door openings (and the walls as a whole), the more starting points can be selected before gluing. This, in turn, will help to make repairs better.
Due to inexperience, the wrong beginning can be chosen, which can lead to some visual defects:
- If initially the place where to start gluing was incorrectly selected, the canvas may tilt over time (the sheet will be glued already at an angle).
- Also, the alignment of the picture may be complicated or completely impossible.
- Wrong choices can lead to increased consumption of wall products.
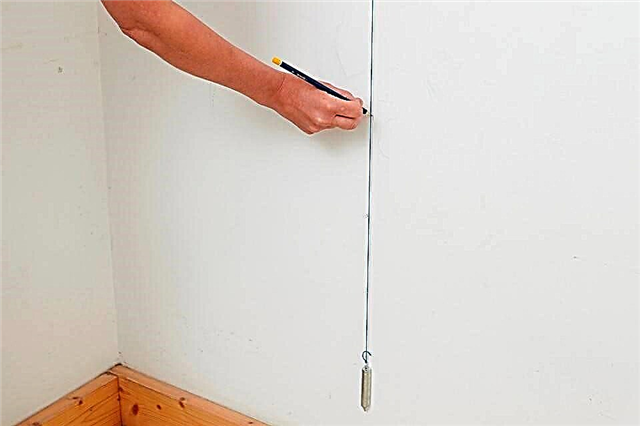
Before you begin, you need to find the most even opening in the room. If none of the available options is suitable, you can make a new benchmark. To do this, you will need a rope, a load and what the rope will fasten to the ceiling (for example, a nail or a button). Procedure: fasten the load to the edge of the rope and hang it with the opposite edge to the ceiling using a nail.
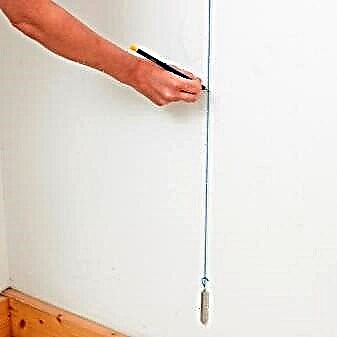
Then, along the line received, draw a strip with a pencil, which will serve as the place for gluing the first strip of wallpaper. The smoother the initial reference point you have chosen, the less difficulties there will be with repair work.
From a larger object in two directions
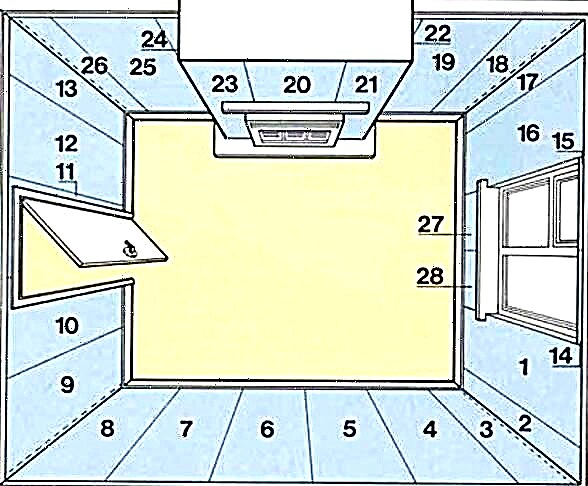
When there are several door and window openings in a room, it is even more difficult to determine the starting point. In this case, it is better to adhere to such advice - we select the largest landmark and move from it in both directions.
If there is a bay window in the room, it is better to start gluing the wallpaper in two directions from the structural recess.
Choosing the beginning of wallpapering on the ceiling
There are two main ways of wallpapering the ceiling. Strips can be placed in the direction of:
- from the beginning of the junction of the wall with the ceiling,
- from the center.
The first method is much simpler; it does not require special skill. Stripes overlap one after another. But the last strip almost always has to be cut, and this does not look very aesthetically pleasing, especially if there is a pronounced pattern on the wallpaper.In this case, it is better to give preference to the second method. When gluing from the center, it is easier to achieve symmetry - the extreme canvases will be the same width and the pattern will look harmonious and natural. The center of the surface is determined using two threads stretched along the diagonals of the ceiling and draw a straight line perpendicular to the wall. Next, half the width of the roll departs from it in both directions and outlines the boundaries of the first strip.
What materials and tools will be required
In order not to be distracted during work, immediately prepare everything you need. You will need:
- laser level - to control the vertical. You can use a plumb line - we attach the load to a long thread and fix it at the top of the wall. To avoid errors, take a thread of sufficient length - it should reach the floor,
- pencil - necessary for marking. You can take a marker,
- roller for applying adhesive to the walls,
- a brush - for smearing corners and hard-to-reach areas - behind the batteries,
- glue dilution tank - its size should correspond to the size of the roller,
- soft rags and sponges - for smoothing wallpapers and removing protruding glue. You can roll the wallpaper with a dry roller,
- plastic spatula - for working in hard-to-reach places,
- wide metal spatula for cutting the wallpaper edge at the junction of the wall with the floor and ceiling,
- Stationery or construction knife for cutting the canvas.
How to mark a vertical on uneven walls
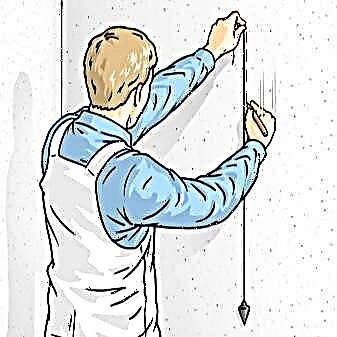
If the wall is uneven, you can mark the vertical with a load. To do this, hang the load on the rope, and make a loop at the other end of the cord. Without sparing chalk, we rub the rope and hang it on a nail driven in under the very ceiling. Slightly pull the rope from below, holding the hooked weight and release. As a result, an even strip of chalk remains on the wall.
Glue application
In the reign of paper wallpaper, glue was applied directly to strips of material. Wallpaper should have been slightly soaked with adhesive. This process was rather inconvenient and time-consuming. It was necessary to provide enough space on the floor - for unfolding the material. When smearing, the floor around the strip was dirty, and the remaining glue had to be wiped each time so as not to spoil the following cuts.
Modern non-woven and vinyl wallpapers do not need to be applied directly to the canvas. It is good enough to coat the walls, and the material is easily fixed. If the joints are not stuck, you can additionally apply the composition to them already on the wall.
How to glue corners
For high-quality pasting of the corner, the following conditions must be observed:
- prepare corners - align them as much as possible with the help of building mixtures. You can use plastic or metal corners with fiberglass reinforcing mesh. They need to be fixed with putty. This technology allows you to align the corners as much as possible,
- it is necessary to stick strips with an overlap, slightly bending one of them and covering the first section with adjacent ones,
- if there is a pronounced pattern on the wallpaper, its lines should be neatly aligned,
- You need to carefully level the wallpaper to hide existing defects and avoid creases and tears. For this work, you need to use a special roller, plastic or rubber spatula.
The nuances of pasting the walls behind the radiator and above the window
The most difficult work begins at the moment of pasting the wall behind the radiator. If the wallpaper is applied to the wall before installing the batteries, then the only difficulty will be to correctly measure the pieces of wallpaper and combine the pattern well. But such a situation is possible only when finishing a completely new apartment immediately after the delivery of the house. Otherwise, you will either have to remove the radiators, which in itself is a difficult task, or paste over these places with small pieces of wallpaper.
You can completely abandon the application of wallpaper and hide the unsightly area with curtains. This option is only suitable if the curtains are tight enough and reach the floor. If we use Roman curtains or cafes, it will not be possible to hide the visible defects of the repair. Therefore, it is worth trying and decorating this part of the wall with the same material as the rest of the space.
- Dismantling the battery - it is better to invite a specialist, but if necessary, you can cope on your own. Before starting work, close the hot water tap and check valve. Be sure to place a container to collect water. The battery can only be removed after draining the water completely. If the cranes are old, leave the work to specialists - you may have to turn off the entire riser.
- We eliminate surface defects - we remove the growths of old paint and plaster with a hammer and a chisel, paying particular attention to the border with the baseboard.
- Putty small cracks and potholes.
4. Level the surface with plaster. We stop work for several days until the coating dries completely. It will take about a week. - Primer the surface to increase adhesive properties. We apply the composition in 2 layers, each of which must completely dry.
- We measure the cuts of wallpaper, so as to combine the picture. Glue the cuts on both sides so that an unaesthetic connection is hidden behind the radiator. We put glue on the wall and press the prepared pieces. Excess cloth is removed with the help of an office or construction knife. Wipe the exposed glue with a soft, natural cloth.
To glue strips above the window opening, carefully measure the cuts. Best of all, if the vertical bar on top will go into this space. To do this, cut a corner in it. This option allows you to gently go around the window.
When using lambrequins, you can refuse to stick the zone above the window. But if you want to change the style of the curtains, you have to re-glue all the wallpaper - the old stripes during this time can change color.
Wallpaper Drying Time
The drying time of the wallpaper depends on the quality and composition of the material, as well as on the indoor microclimate. The higher the humidity, the longer it will take to dry. For single-layer paper canvases, 12 hours is enough. If the canvas consists of several layers - such as "duplex" or "triplex", it can take 2 days to dry.
Vinyl wallpapers with paper backing dry in 18-24 hours. The same non-woven vinyl can dry from 24 to 48 hours.
It should be noted that in the first couple of days only evaporation of moisture occurs, the glue polymerization process continues even longer. Therefore, it is necessary to avoid airing for several more days and not to allow drafts, since the wallpaper can peel off.
Changes in humidity and temperature should also be avoided. At this time, you can pay attention to the quality of the new coating, glue the removed corners.
When you can open windows and ventilate the room
Windows and doors should be kept closed during the entire drying period of the wallpaper, since accelerated drying of the adhesive can lead to peeling of the material. So you save yourself from the extra work of gluing wallpaper. From drafts and sudden changes in temperature, the canvas can partially lag behind the walls or completely move away. Peeled off wallpaper most often becomes unusable and materials for decoration will need to be purchased again. Keep the windows closed for 2-3 days. Some types of wallpaper require an even longer period.
It is necessary to take into account the drying time of the adhesive composition. In modern materials, this period is quite short. But for their drying, it takes at least 36 hours, subject to a normal microclimate, and with high humidity and low temperature it may take two days.
It is unacceptable to artificially accelerate the drying process of wallpaper. Never turn on heaters or fans.
If repairs are made in the summer and no temperature difference is expected, then some types of wallpaper - vinyl and even non-woven can be glued with open windows.
How to glue wallpaper in a room with a stretch ceiling
Before you start wallpapering in a room with a stretch ceiling, you need to carry out preparatory work - take out the furniture, protect the edges of the ceiling with masking tape. This will prevent the adhesive or primer from getting onto the film or fabric. If the ceiling profile is fixed on old wallpaper, a neat incision must be made along the edge of the finishing material. We protect the ceiling with a wide roller and draw a line with a clerical knife. The notch should be even and clear. After that, we moisten the old wallpaper and remove them from the wall.
We clean the walls of dirt to improve the quality of adhesion of wallpaper to the surface, primer the base. This will avoid excessive consumption of glue, will not allow the wallpaper to get dirty. The area near the ceiling is primed as carefully as possible, since dried drops will be difficult to remove.
If the ceiling is framed by a baguette, you can cut the old wallpaper along its line and stick new overlap. After that, the excess material is cut with a clerical knife. Be sure to use a wide spatula at this point. Any careless movement can lead to cuts on the stretch sheet and its complete deterioration.
Selection of tools and materials
Before you start gluing wallpapers, you need to study some points of preparation.
First, you should choose the type of wallpaper, determine the required amount, and also choose the right glue. This is possible directly in the construction supermarket or in the market. When calculating the amount of glue and the number of rolls, it is necessary to round each result up. In particular, this applies to cases of choosing wallpaper decorated with drawings (then their consumption increases by about 20 percent).
For sticking we will need:
- the container in which the adhesive is bred,
- brush
- pencil,
- scissors,
- putty knife,
- roulette,
- plumb
- rubber roller.
How to paste wallpaper
Regardless of the location of this work, certain conditions must be observed. Before starting work, it is necessary to prepare the premises, take out furniture products from it, and close this room with foil. Wall cleaning, leveling and priming are required.
Before cutting the canvas, you need to determine the height, adding a small margin. It is possible to measure with a tape measure and using a cloth. When using the canvas alone, measuring will not work: you will need to work in pairs.
Start gluing the wallpaper with smearing the canvas with glue, with the most attention being paid to the edge, then the canvas is left to soak. Glue is also applied to the surface of the wall. Leaving a greased canvas for a long time is unacceptable, otherwise it will soften and become unusable.
When sticking the canvas on the wall, you must bend the lower edges to prevent it from dragging on the floor, after which the canvas is transferred to the wall and glued. To ensure a tight fit, the wallpaper is smoothed with brushes.
Which side are the wallpapers glued to?
Before gluing, it is necessary to determine the side from which to start gluing the wallpaper correctly. Choosing a method, consider the features of lighting. A few dozen years ago, wallpaper gluing took place exclusively overlapping, on one side of the canvas there was a strip for gluing another fabric onto it. Sticking started from the side of the window to hide the transition.
Various gluing methods are now being used, as a result of which the question of choosing the side from which to start gluing is not so relevant. When using wallpaper with a high density, overlapping gluing is undesirable in principle, so such wallpapering from the side of the window is unacceptable.
Wallpapering Methods
- From the door. In the case when the walls are glued vertically, a clear geometry is required, for this reason you can start gluing near any vertically located landmark. The first canvas is glued vertically, this is ensured by special devices (plumb), then continue to paste in any direction.
- From the corner. This method is only suitable when the corners of the room have perfect evenness. However, this condition is rarely met, therefore, it is preferable to glue noticeable strips of cloth near ordinary landmarks.
- From the largest landmark. In the case when the room has many aisles and windows, it is better to perform gluing from the largest landmark.
- From two or more lines. This is the correct answer to the question of where to start gluing wallpaper, in a situation where a large window is present in the room. Pokleyka is carried out in 2 sides from this window.
In the TAM.BY catalog you will find the contacts of masters for any type of finishing work, including wallpapering, as well as the addresses of stores where you can buy everything for construction and repair.
If you notice an error in the text of the news, please select it and press Ctrl + Enter
Why choose a reference point
The first strip of wallpaper should be glued extremely smoothly. All other pieces of the roll will be mounted on the wall relative to the first, in a circle. If it was mounted unevenly, then at the end the joints will not converge, and you will have to redo everything. That is why it is so important to find the perfect vertical line as a guide.
In the Soviet Union, wallpapers were glued only from the window, and this is due to several reasons. Firstly, there was no such varied choice of materials and textures. Wallpaper was paper, thin, and easily overlapped. This made it possible to hide ugly thickenings. Secondly, the window line in Soviet apartments was often smoother than the door, and especially the corner.
Now the structure of the wallpaper allows you to stick them more accurately - butt. Therefore, it is permissible to start from almost any place. The main thing is that the vertical reference line is flat, then the first and last sheet will converge. The coincidence of the verticals will be especially noticeable on the wallpaper with a geometric pattern.
Start from the window
The most popular way. But he is chosen not only because of many years of stereotypes. Moving from the window is really convenient. How to decide whether to glue wallpaper from a window or to a window? If the canvas is wide, then it is likely that in the case of a start from the door when approaching the window the entire layer does not fit. Have to cut the roll along.
Sometimes wallpaper is glued on both sides of the window. In this case, the joint is located under the window and is covered with curtains. You can act similarly from the door, placing the joint over the opening.
When gluing from a window, it is easier to avoid the problem when it is necessary to correlate the sheets according to the drawing. It is especially difficult to do this under the windowsill and above the window. You have to cut a lot and compare. Complicate the work of heating radiators, which are often located under the window.
Door as a landmark
Modern doors are installed as evenly as possible, so it is more than acceptable to start installing wallpaper from them. The main convenience of the method is that the first and last cloth will not have to be compared, since there will be a doorway between them. This is a good way for a wallpaper with a bright print, because the picture may not converge at the end of installation.
In what cases the corner will help
Gluing wallpaper from the corner is not the most popular way. In order for the installation to be successful, the angles must be as even as possible, but this is a rare occurrence. At the same time, this method is allowed if the room does not have a window, or the doorway is too curved.
From the corner it will be right to start if the design of the room provides for several types of wallpaper. For example, opposite walls are glued the same way. In this case, to avoid the accumulation of joints on the corner, you should start right from it.
The evenness of the reference can be checked with special construction tools. Even if the vertical line visually looks straight, do not neglect the additional check. Negligence will cost you nerves, time and additional materials. The construction level is the simplest tool, the longer it is, the more convenient it is to measure the walls. Vertical lines are also drawn using a plumb line. The most expensive device is the laser level, but it gives the most accurate result.
Other guidelines and tips
These tips will help determine where to start:
- If the room has a large number of large objects - arches, windows, openings, then you need to start from the largest of them.
- If the wallpaper has a very pronounced print, then in order to avoid an uneven joint, they hide it in an inconspicuous place. That is, you need to start from where the discrepancies will not be visible. It’s good if there is a tall piece of furniture, but consider whether a relocation is planned.
- So that the joints are invisible to the eye, they are made above windows or doorways, under batteries, behind a kitchen set.
- Measure the walls, determine their maximum and minimum height: in some cases, this helps to find a reference point. Do not immediately cut the roll into identical pieces so that you do not have to correct the work by gluing the missing centimeters on top and bottom.
- Pay attention to the lighting of the room where the window is located, as the wall lamps shine. Well, if the joints will not be placed in a prominent place.
- It is better to start from the far corner, then when you enter the room, your eyes will fall on a flat canvas, and not on the joint.
- Vinyl, non-woven and cullet cannot be glued together, this must be taken into account. In an extreme case, it is better to cut a few centimeters than make a convex connection that will spoil the view.
- If the distance between the exit to the balcony and the nearest corner is very small, it is better to start from there.
- If the wallpaper is glued with overlap, then professionals recommend moving from left to right. Only thin paper wallpapers are glued in this way.
- Tapestries in the corridor begin to glue from the far inner corner.
- In the kitchen you must remember to leave space for the kitchen apron.
What else to consider
When gluing, you need to take into account not only the location of doors and windows, but also other elements:
- see how the sockets and switches are located,
- where important furniture and other interior details are located,
- the location of the windows relative to each other,
- where is the balcony
- placement of batteries, pipes,
- how do the door and adjacent corners relate
- the width of the wallpaper also plays a role.
These nuances will help you determine exactly where to start work.
Advice! Before starting work, turn off the power to the room, remove the covers from the sockets and paste the wallpaper on top. After drying, you only need to cut holes and install sockets. It will turn out much more accurately than cutting wallpaper along the line of covers.
What to do if the corners are uneven
Jagged corners - a real puzzle for those who glue new wallpapers. It is especially problematic to make a print finish, as the pattern will not converge due to unevenness, verticality will be lost. Folk wisdom found a way out of this situation:
- For each new wall, a new reference point is selected.
- At the junction, each canvas should go to the adjacent wall by about 10 cm.
- A vertical line is drawn on the strip of approach. It should be flat and not parallel to the corner.
- The next wall is pasted over from the drawn strip. The method works, but only for thin wallpaper that can be glued with an overlap. For heavy non-woven and vinyl samples, this option is not suitable. In this case, you have to work with a sharp clerical knife to dock the picture.
In such a case as wallpapering the walls, the saying is appropriate: measure seven times, cut once. In case of an error, all joints will be striking. It is necessary to take into account all the details, the location of key interior items, the evenness of the corners and much more, so that the repair is completed successfully.